Thursday, September 23, 2010

Linux: Increase number of loop devices

It is a common practice to mount any iso files to file system and make it available in your network environment for usage like remote installation.  You may modify /etc/fstab to make these iso files mounted during system startup.

Mounting iso files consume loop devices (e.g.: /etc/loop*).  Linux kernel limits the number of loop devices to 8 by default.  If you have more than 8 iso files to mount, you will encounter an error: “mount: could not find any free loop device”.

Loop Device

Loop devices may be deployed as a module or built with Linux kernel.  It depends various Linux Distro releases.  You may use the following command to check if the loop devices are deploy with module, if not it should have built with kernel:

-bash-3.2$ /sbin/lsmod |grep -i loop
loop                   16581  0

If lsmod able to list out loop module, the loop device are deployed as module.  You may then using module configuration to increase the number of loop devices.  Or else you should use append kernel parameters to increase the number of loop devices.

Solution: loop device is a module

  1. Un-mount all files mounted to loop device
  2. Add a line in /etc/modprobe.conf to increase number of loop devices: 
      options loop max_loop=64
  3. Run
      # /sbin/rmmod loop
    to remove the loop devices module
  4. Run
      # /sbin/modprobe loop
    to re-insert the loop devices
  5. Run
      # ls /dev/loop*
    to verify loop devices has increased
  6. Run
      # mount –a
    to re-mount static file system information in /etc/fstab

Solution: loop device built into kernel

The following shows an example of change the kernel parameter in grub boot file to increase the number of loop devices:

[root@dolphin mnt]# cat /boot/grub/menu.lst
# grub.conf generated by anaconda
#
# Note that you do not have to rerun grub after making changes to this file
# NOTICE:  You have a /boot partition.  This means that
#          all kernel and initrd paths are relative to /boot/, eg.
#          root (hd0,0)
#          kernel /vmlinuz-version ro root=/dev/mapper/vg_dolphin-root
#          initrd /initrd-[generic-]version.img
#boot=/dev/sda
default=0
timeout=0
splashimage=(hd0,0)/grub/splash.xpm.gz
hiddenmenu
title Fedora (2.6.33.3-85.fc13.x86_64)
        root (hd0,0)
        kernel /vmlinuz-2.6.33.3-85.fc13.x86_64 ro root=/dev/mapper/vg_dolphin-root \
rd_LVM_LV=vg_dolphin/root rd_LVM_LV=vg_dolphin/swap \
rd_NO_LUKS rd_NO_MD rd_NO_DM LANG=en_US.UTF-8 \
SYSFONT=latarcyrheb-sun16 KEYTABLE=us \
rhgb quiet max_loop=64 initrd /initramfs-2.6.33.3-85.fc13.x86_64.img

A “max_loop=64” is appended into kernel parameter to increase the number of loop devices to 64.  You should reboot the Linux OS to make the changes take effects.

Tuesday, September 21, 2010

NFS: Network File System

Introduction

Network File System (NFS) is a network file system protocol originally developed by Sun Microsystems in 1984, allowing an user on a client computer to access files over a network in a manner similar to how local storage is accessed.

Installation

yum install nfs-utils

To check nfs version:

[root@example]# cat /proc/fs/nfsd/versions
+2 +3 +4 +4.1

Default Property

  1. Server instance name: nfs
  2. Configuration file:
    1. /etc/sysconfig/nfs
    2. /etc/exports
  3. Services:
    1. portmapper (port: 111 tcp/udp)
    2. nlockmgr (port: dynamic)
    3. nfs (port: 2049 tcp/udp)
    4. mountd (port: dynamic)
  4. Log file: /var/log/messages

Configuration

Configuration: /etc/sysconfig/nfs

/etc/sysconfig/nfs consist the configuration parameters for various NFS services.  Unlike other TCP/IP service, NFS service consist of several services.  Some services’ TCP and UDP ports are dynamic allocated.  You may want to fix the port numbers or else you will in trouble when configure firewall in later stage:

# TCP port rpc.lockd should listen on.
LOCKD_TCPPORT=32803
# UDP port rpc.lockd should listen on.
LOCKD_UDPPORT=32769

MOUNTD_PORT=892

Restart the NFS service for the changes to take effect:

service nfs restart

You may use rpcinfo –p to check if NFS services are working:

[root@example ~]# rpcinfo -p
   program vers proto   port  service
    100000    4   tcp    111  portmapper
    100000    3   tcp    111  portmapper
    100000    2   tcp    111  portmapper
    100000    4   udp    111  portmapper
    100000    3   udp    111  portmapper
    100000    2   udp    111  portmapper
    100024    1   udp  47618  status
    100024    1   tcp  55823  status
    100011    1   udp    875  rquotad
    100011    2   udp    875  rquotad
    100011    1   tcp    875  rquotad
    100011    2   tcp    875  rquotad
    100021    1   udp  32769  nlockmgr
    100021    3   udp  32769  nlockmgr
    100021    4   udp  32769  nlockmgr
    100021    1   tcp  32803  nlockmgr
    100021    3   tcp  32803  nlockmgr
    100021    4   tcp  32803  nlockmgr
    100003    2   tcp   2049  nfs
    100003    3   tcp   2049  nfs
    100003    4   tcp   2049  nfs
    100227    2   tcp   2049  nfs_acl
    100227    3   tcp   2049  nfs_acl
    100003    2   udp   2049  nfs
    100003    3   udp   2049  nfs
    100003    4   udp   2049  nfs
    100227    2   udp   2049  nfs_acl
    100227    3   udp   2049  nfs_acl
    100005    1   udp    892  mountd
    100005    1   tcp    892  mountd
    100005    2   udp    892  mountd
    100005    2   tcp    892  mountd
    100005    3   udp    892  mountd
    100005    3   tcp    892  mountd

Configuration: Firewall

You may need to allow the following ports for client access:

-A INPUT -m state --state NEW -m tcp -p tcp --dport 2049 -j ACCEPT
-A INPUT -m state --state NEW -m udp -p udp --dport 2049 -j ACCEPT
-A INPUT -m state --state NEW -m tcp -p tcp --dport 32803 -j ACCEPT
-A INPUT -m state --state NEW -m tcp -p udp --dport 32769 -j ACCEPT -A INPUT -m state --state NEW -m tcp -p tcp --dport 111 -j ACCEPT -A INPUT -m state --state NEW -m udp -p udp --dport 111 -j ACCEPT -A INPUT -m state --state NEW -m tcp -p tcp --dport 892 -j ACCEPT -A INPUT -m state --state NEW -m udp -p udp --dport 892 -j ACCEPT

Configuration: /etc/exports

You may specify the folder you want to export in /etc/exports:

/data   example.com(ro)
/home   example.com(ro)

To check what the server exports:

exportfs -v

To re-export modification done in /etc/exports:

exportfs -r

NFS Client

Client: mount

The following example show how to use mount to mount the NFS export file system:

# mount example.com:/data /mnt/data
# mount example.com:/home /home

Client: /etc/fstab

You may also add the NFS mount in file system table: /etc/fstab:

example.com:/data   /mnt/data  nfs rw 0 0
example.com:/home   /home nfs rw 0 0

Client: autofs or automount

An example using /etc/auto.indirect to serve autofs mount:

/mnt/data         -rw example.com:/data
/home -rw example.com:/home

An example of using LDAP to serve autofs mount:

dn: cn=/mnt/data,ou=auto.indirect,ou=autofs,dc=example,dc=com
objectClass: automount
objectClass: top
automountInformation: -rw example.com:/data
cn: /mnt/data
dn: cn=/home,ou=auto.indirect,ou=autofs,dc=example,dc=com
objectClass: automount
objectClass: top
automountInformation: -rw example.com:/home
cn: /home

Reference

  1. Linux NFS. url: http://www.linux-nfs.org/
  2. Linux NFS-HOWTO. url: http://nfs.sourceforge.net/nfs-howto/

Friday, September 17, 2010

Windows 7: Unable to remove a printer

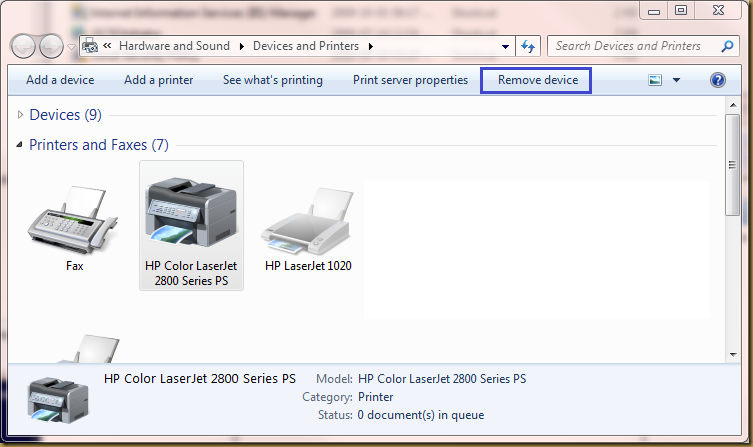
We may use “Remove Device” in “Devices and Printers” window to remove a printer that no longer use.  However, there are situation where the “Remove Device” doesn’t remove the printer.  Even if we perform this action in privilege account:

Capture

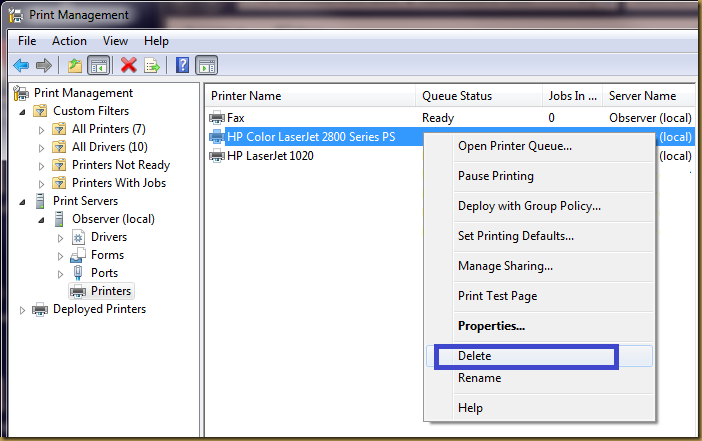
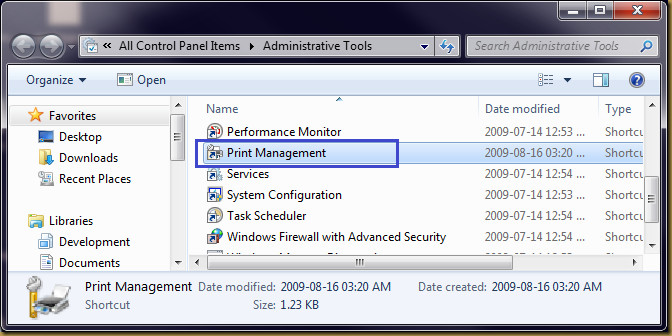
To remove this stubborn printer from your devices, we may use the Print Management Console in Administrative Tools:

2

Just Select the printer to remove and use the popup menu to delete printer.  You may need to perform this in privilege mode if it doesn’t work.

3

Thursday, September 16, 2010

Windows 7: What’s new

Windows Desktop

Snap

  • Drag the title bar of an open window to either side of the desktop to align it there, or
  • Drag it to the top of the desktop to maximize the window.
  • To expand a window vertically using Snap, drag the top edge of the window to the top of the desktop.
  • To return the window to its original size, drag the title bar of the window away from the top of the screen.

Aero Shake

  • Just click the title bar of the window you want to keep open and drag (or shake) the window back and forth quickly, and the other open windows are minimized.
  • To restore the minimized windows, shake the open window again.
  • Press Windows logo key Picture of Windows logo key +Home to minimize all windows except for the currently active window. Press Windows logo key Picture of Windows logo key +Home again to restore all windows

Aero Peek

  • The Show desktop button has been moved the opposite end of the taskbar from the Start button, making it easier to click or point to the button without accidentally opening the Start menu.
  • You can temporarily view or peek at the desktop by just pointing to the Show desktop button. When you point to the Show desktop button at the end of the taskbar, any open windows fade from view, revealing the desktop. To make the windows reappear, move the mouse away from the Show desktop button.
  • Press the Windows logo key Picture of Windows logo key +Spacebar to temporarily preview the desktop. To restore the desktop, release the Windows logo key Picture of Windows logo key +Spacebar.
  • To minimize open windows so that they remain minimized, click the Show desktop button, or press the Windows logo key Picture of Windows logo key +D. To restore the open windows, click the Show desktop button again or press the Windows logo key Picture of Windows logo key +D again.

Desktop background

  • Your desktop background doesn't have to be a single picture anymore. With Windows 7, you can display a slide show of pictures, instead. Some Windows themes include a slide show, or you can create your own slide show from your personal collection of pictures.

Start menu

Jump Lists

  • Jump Lists are lists of recent items, such as files, folders, or websites, organized by the program you use to open them.
  • In addition to being able to open recent items using a Jump List, you can also pin favorite items to a Jump List, so that you can easily access the programs and files you use every day.

Libraries

  • A library gathers files from different locations and displays them as a single collection, without moving them from where they’re stored. There are four default libraries (Documents, Music, Pictures, and Videos), but you can create new libraries for other collections. The Documents, Music, and Pictures libraries appear on the Start menu by default. Like other items on the Start menu, you can add or remove libraries, or customize their appearance.

Search

  • The Start menu includes a search box that you can use to find files, folders, programs, and e-mail messages stored on your computer. When you start typing a word or phrase in the search box, the search begins automatically, and the search results temporarily fill the Start menu space above the search box.

TaskBar

Taskbar buttons

  • Taskbar buttons have a new look and do more than just show you which programs are running.
  • In the default view, each program appears as a single, unlabeled button—even when multiple items for a program are open—for a clean and uncluttered look. You can customize the taskbar appearance to change how buttons appear and how they group together when you have multiple items open. You can also choose to see individual buttons for each open file.
  • You can also rearrange and organize buttons on the taskbar, including pinned programs and running programs that aren’t pinned, so they appear in the order you prefer. To rearrange the order of buttons on the taskbar, drag a button from its current position to a different position on the taskbar. You can rearrange buttons as often as you like.

Previewing open windows with Aero Peek

  • When you open multiple windows on the desktop, sometimes it can be a challenge to view separate windows and switch between them.
  • You can use Aero Peek to take a quick look at other open windows without clicking away from the window you are currently working on. Point your mouse at a taskbar button, and thumbnail previews of any open windows associated with that button appear above the taskbar. If you want to open a window you are previewing, just click its thumbnail. For more information.

Pinning items

  • Pinning programs to the taskbar complements pinning programs to the Start menu, like in earlier versions of Windows. When you pin a favorite program to the taskbar, you can always see it there and easily access it with a single click. Windows 7 also includes Jump Lists, so that in addition to launching a program from the taskbar, you can now launch favorite and recent items from that program, just by clicking the same button.
  • Jump Lists are lists of recently or frequently opened items, such as files, folders, tasks, or websites, organized by the program that you use to open them. In addition to being able to open recent items using a Jump List, you can also pin favorite items to a Jump List so you can quickly get to the items that you use every day.
  • On the taskbar, Jump Lists appear for programs that you've pinned to the taskbar and programs that are currently running. You can view the Jump List for a program by right-clicking the taskbar button, or by dragging the button toward the desktop. You open items from the Jump List by clicking them.

Notification area

  • A new way of managing the notification area on the end of the taskbar means you get fewer notifications, and the ones you get are collected in a single place in Windows.
  • In the past, the notification area could sometimes become cluttered with icons. Now, you can choose which icons appear visible at all times. And you can keep the rest of the icons on hand in an overflow area, where they’re accessible with a single mouse click.
  • Action Center is a single area that collects important notification messages about security and maintenance settings. You can review these messages later if you don’t want to be interrupted. When you click the Action Center icon Picture of Action Center icon and then click Open Action Center, you’ll see information about the things you need to take action on, and find helpful links to troubleshooters and other tools that can help fix problems.

Viewing the desktop

  • The Show desktop button has been moved to the opposite end of the taskbar from the Start button, making it easier to click or point at the button without accidentally opening the Start menu.
  • In addition to clicking the Show desktop button to get to the desktop, you can temporarily view or peek at the desktop by just pointing your mouse at the Show desktop button, without clicking it. When you point at the Show desktop button at the end of the taskbar, any open windows fade from view, revealing the desktop. To make the windows reappear, move the mouse away from the Show desktop button.
  • This can be useful for quickly viewing desktop gadgets, or when you don’t want to minimize all open windows and then have to restore them.

Wednesday, September 15, 2010

Microsoft Windows and WebDAV

Introduction

Web-based Distributed Authoring and Versioning (WebDAV) is a set of methods based on the Hypertext Transfer Protocol (HTTP) that facilitates collaboration between users in editing and managing documents and files stored on World Wide Web servers. WebDAV was defined in RFC 4918 by a working group of the Internet Engineering Task Force (IETF).

Microsoft Windows supports WebDAV since Windows 98.  It also available in Windows 2000, XP and Windows 7.

WebDAV Service: Apache HTTPD

The following shows two simple WebDAV configuration for Apache httpd server.  The “DAV On” indicates the URL is a WebDAV service.

Configuration: Basic Authentication using LDAP

<Location /setup>
        DAV On
        Options All
        Order deny,allow
        Allow from all
        AuthType Basic
        AuthName "DAV"
        AuthBasicProvider ldap
        AuthzLDAPAuthoritative off
        AuthLDAPURL ldap://ldap.estream.com.my/ou=user,dc=example,dc=com?uid?sub?(objectclass=posixAccount)
        Require valid-user
</Location>

Configuration: Digest Authentication using password file

Digest authentication send MD5 hashed password to httpd server and thus provide a bit more security compare to Basic authentication.  However, Digest authentication is also not a secure mechanism for HTTP service.

<Location /setup>
        DAV On
        <LimitExcept GET OPTIONS>
                Options All
                Order deny,allow
                Allow From all
                AuthType Digest
                AuthName "DAV"
                AuthDigestProvider file
                AuthUserFile /etc/httpd/conf.d/digest
                Require valid-user
        </LimitExcept>
</Location>

WebClient service

In Windows XP or perhaps Windows 2000 onwards, WebClient is a service that communicate to WebDAV server.  Microsoft Windows doesn’t provide any GUI tools to configure WebClient.  All the configuration is done via Registry setting in HKEY_LOCAL_MACHINE\SYSTEM\CurrentControlSet\services\WebClient.

2

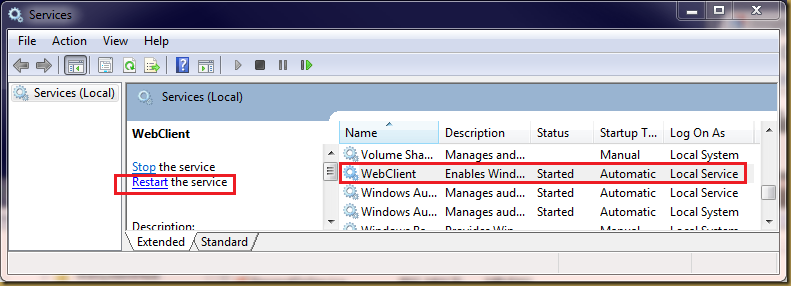
You should restart the WebClient if you modify any WebClient items in Registry to make changes take effect.

Windows XP and WebDAV

Both Basic and Digest Authentication works with Windows XP’s WebClient without much configuration.

You may connect to a WebDAV share via:

  1. File | Open of Internet Explorer (check Open as Web Folder):
    3
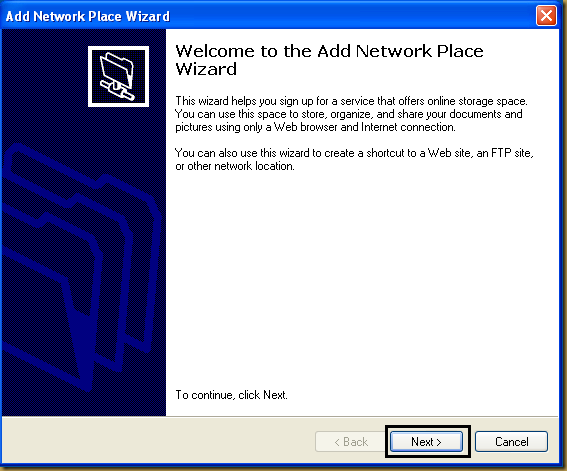
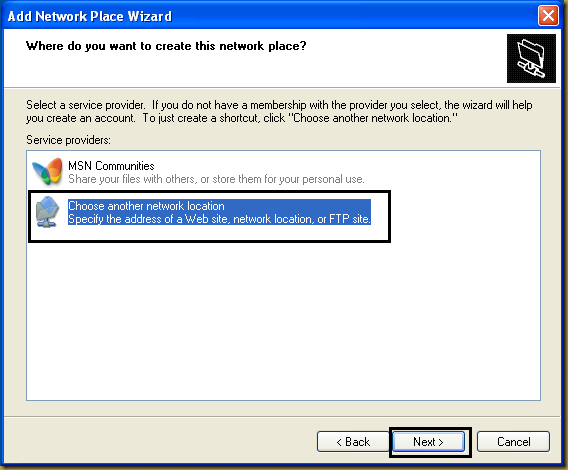
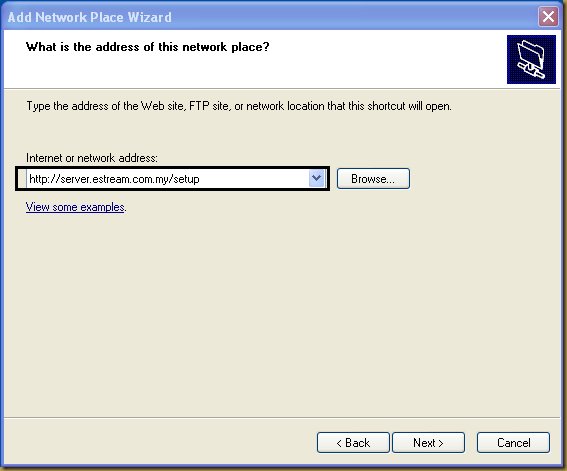
  2. “Add a network place” in My Network Places:

    4 
    5 
    6 
    7

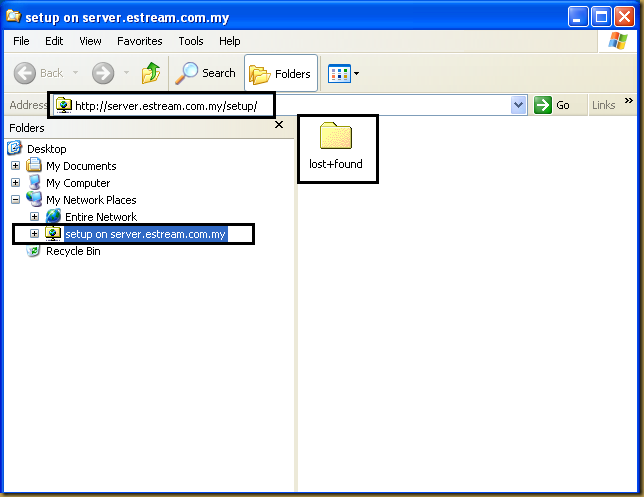
Once the connection is authenticated and authorised, you should able to access the WebDAV share just like normal network share in Windows Explorer.

8

Windows 7 and WebDAV

It is not easy to make WebDAV works in Windows 7 like Windows XP.  You need extra care to get WebDAV done in Windows 7.

Windows 7 WebClient service supports Digest Authentication by default.  This restriction has lead to 2 use cases failed:

  1. All WebDAV with Basic Authentication will fail no matter how you configure the WebDAV URL.
  2. All WebDAV using Digest Authentication and LDAP as backend authentication will fail.  The LDAP service is unable to perform authentication again digest password.

If the WebDAV URL support digest authentication using file as AuthDigestProvider, Windows 7 should establish the WebDAV connection successfully.  During the frequent trial and error testing among httpd server and Windows 7 WebClient service, you might need to restart the WebClient service before start a new test.

You may change an entry in registry:

HKEY_LOCAL_MACHINE\SYSTEM\CurrentControlSet\services\WebClient\Parameters\BasicAuthLevel

to allow Basic Authentication work in WebClient service.  BasicAuthLevel’s default value is 1.  The meaning of BasicAuthLevel is as follow:

0 - Basic authentication disabled
1 - Basic authentication enabled for SSL shares only
2 or greater - Basic authentication enabled for SSL shares and for non-SSL shares

You may set BasicAuthLevel to 2 for Basic Authentication to work in non SSL WebDAV share.  You may then use Basic Authentication  with LDAP as backend authentication service for the WebDAV share.

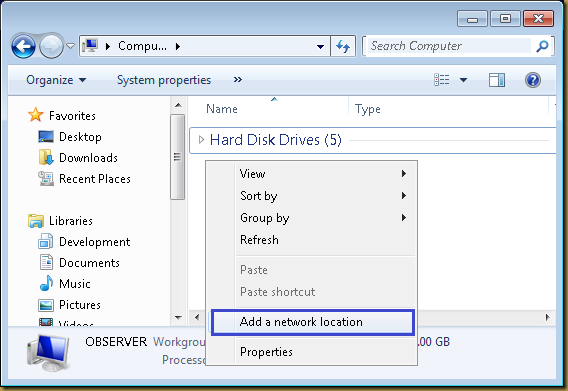
To add a WebDAV share in Windows 7,  you may use “add a network location” as shown in Windows Explorer:

9 

The rest of configuration is straight forward, just enter the WebDAV share URL and supply valid credential if necessary and you can start access the  WebDAV share as usual.

TroubleShoot

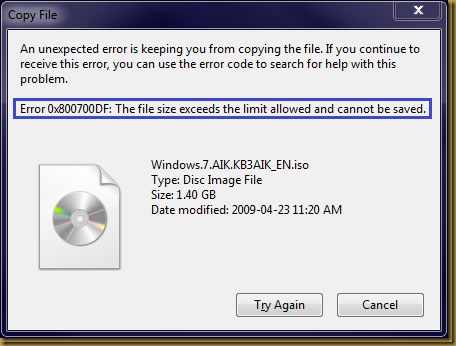
Error 0x800700DF: The file size exceeds the limit allowed and cannot be saved

When you use Windows 7 to access a WebDAV share copying a large file more than 50MB, you may encounter the following error:

1_thumb1

There is a setting for webclient service in registry that restrict the transmit file sizes (HKEY_LOCAL_MACHINE\SYSTEM\CurrentControlSet\services\WebClient\Parameters\FileSizeLimitInBytes):

Capture

Modify this value to something like 0xFFFFFFFF will allow transferring file size of 4GB.

Restart the WebClient service refresh the setting.

Reference

  1. You may receive an error message when you try to download a file that is larger than 50000000 bytes from a Web folder on a computer that is running Windows Vista or that is running Windows XP with Service Pack 1 or with Service Pack 2.
    URL: http://support.microsoft.com/kb/900900/en-us
  2. Howto Fix Webdav On Windows 7 64bit. URL: http://shon.org/blog/2010/03/04/howto-fix-windows-7-64bit-webdav/

Tuesday, September 14, 2010

Apache HTTP Server

Introduction

Apache HTTP Server is a famous open source web server.

Installation

yum install httpd

Default Behavior

  1. Server instance name: httpd
  2. Configuration file:
    1. /etc/httpd/conf/httpd.conf
    2. /etc/httpd/conf/conf.d/*
  3. TCP Port: 80
  4. Log files:
    1. /var/log/httpd/access_log
    2. /var/log/httpd/error_log
  5. Working folder: /var/www/html

Configuration

Configuration: Log Level

Default log level for httpd is “warn”.  You may change the log level to debug for more detail log message when you encounter problem with configuration.

For example:

LogLevel debug

Configuration: Server Side Includes (SSI)

SSI (Server Side Includes) are directives that are placed in HTML pages, and evaluated on the server while the pages are being served. They let you add dynamically generated content to an existing HTML page, without having to serve the entire page via a CGI program, or other dynamic technology.

To enable SSI in Apache HTTP, add the following in conf file:

AddType text/html .shtml 
AddHandler server-parsed .shtml 

<Directory /data/www> 
    Options +Includes 
</Directory>

If the index file is a SSI file, you should add this line too:

DirectoryIndex index.html index.html.var index.shtml

Configuration: Virtual Host

The term Virtual Host refers to the practice of maintaining more than one server on one machine, as differentiated by their apparent hostname. For example, it is often desirable for companies sharing a web server to have their own domains, with web servers accessible as www.company1.com and www.company2.com, without requiring the user to know any extra path information.

In order not to mess up the httpd.conf file, we may store the virtual host configuration in a separate file. (eg: /etc/httpd/conf/httpd-vhosts.conf)

vi /etc/httpd/conf.d/httpd-vhosts.conf
NameVirtualHost *:80 

<Directory /data/www> 
    Options +Includes 
</Directory> 

<VirtualHost *:80> 
    DocumentRoot /data/www 
    ServerName www.company1.com 
    ScriptAlias /cgi-bin/ /data/www/cgi-bin/  
</VirtualHost>

Configuration: HTTPS – Secure HTTP

https is HTTP secure protocol.

Installation:

yum install mod_ssl

You may restart httpd service and verify if secure http service is up and running by:

# netstat -na |grep -i 443
tcp        0      0 :::443                      :::*                        LISTEN

The configuration file for mod_ssl is stored in /etc/httpd/conf.d/ssl.conf.

Remember to exclude port 443 in firewall if you want to publish the service.

Configuration: Basic Authentication

mod_auth_basic is the module for http basic authentication.

The following command will prompt for password and create an entry of user with md5 hashed password:

htpasswd -c password_file username

An example of using the basic password file to protect a folder:

<Location /private/>
  AuthType basic
  AuthName "private area"
  AuthBasicProvider file
  AuthUserFile conf.d/password_file
Require valid-user </Location>

Configuration: Digest Authentication

mod_auth_digest is the module for http digest authentication.  It has similar mechanism as basic authentication except the password sent as MD5 hash value instead of plain text.  httpd.conf should include mod_auth_digest by default.

The following command will prompt for password and create an entry of user with md5 hashed password:

htdigest -c password_file digest-realm username

An example of using the digest password file to protect a folder:

<Location /private/>
  AuthType Digest
  AuthName "digest_realm"
  AuthDigestProvider file
AuthUserFile conf.d/password_file Require valid-user </Location>

Configuration: httpd 2.2 LDAP Authentication and authorisation

httpd 2.2 using a module mod_authnz_ldap to perform ldap authentication and authoisation.

The following example attempt to protect a URL cgi-bin with username/password authentication against a ldap directory server.  The LDAP connection is using TLS.

<Location /cgi-bin>
        Order deny,allow
        Allow from example.com
        AuthType Basic
        AuthName "CVSweb"
        AuthBasicProvider ldap
        AuthzLDAPAuthoritative off
        AuthLDAPURL ldap://ldap.example.com/ou=user,dc=example,dc=com?uid?sub
?(objectclass=posixAccount) STARTTLS
        Require valid-user
</Location>

The above configuration should work if your LDAP server is working.

If debug log level is used, you may notice the error_log shows something like this:

[Tue Sep 14 16:38:18 2010] [debug] mod_authnz_ldap.c(376): [client 192.168.0.107] [32672] auth_ldap authenticate: using URL ldap://ldap.example.com/ou=example,dc=example,dc=com?uid?sub?(objectclass=posixAccount)
[Tue Sep 14 16:38:18 2010] [debug] mod_authnz_ldap.c(475): [client 192.168.0.107] [32672] auth_ldap authenticate: accepting alice
[Tue Sep 14 16:38:18 2010] [debug] mod_authnz_ldap.c(847): [client 192.168.0.107] [32672] auth_ldap authorise: authorisation denied

A log message of “authorisation denied” sounds like the authorisation fail.  However, you don’t encounter problem accessing resource from web browser.  This message may confuse when checking the log message during troubleshooting session.

The message was a result from a configuration option:

AuthzLDAPAuthoritative off

The httpd security mechanism requires authentication and authorisation processes to be verified before a resource may access by an user.  In this case, the user is authenticated with user name and password via LDAP service.  And the authorisation process is verified by apache configuration.

Setting AuthzLDAPAuthoritative to off means mod_authnz_ldap let other authorization modules attempt to authorize the user, should authorization with this module fail.  That is the reason why the message “authorisation denied” shown in log.  The mod_authnz_ldap denied to perform authorisation here due to “AuthzLDAPAuthoritative off”.

Now, next problem raise.  If mod_authnz_ldap_ldap denied to perform authorisation, why the resource is accessible after valid credential is supplied via web browser?  And why the authorisation seems successfully perform?  Who perform the authorisation?

The key is this setting:

Require valid-user

The above clause performs authorisation.  It simply means authenticated user of mod_authnz_ldap is always valid and is authorised to use the resource.

What if we attempt to set AuthzLDAPAuthoritative to on?  This simply means mod_authnz_ldap will perform authorisation followed by success authentication:

<Location /cgi-bin>
        Order deny,allow
        Allow from example.com
        AuthType Basic
        AuthName "CVSweb"
        AuthBasicProvider ldap
        AuthzLDAPAuthoritative on
        AuthLDAPURL ldap://ldap.example.com/ou=user,dc=example,dc=com?uid?sub?(objectclass=posixAccount) STARTTLS
        Require valid-user
</Location>

Above configuration will cause browser keep prompt for username and password even correct credential is provided.  Log messages something like these will shown:

[Tue Sep 14 16:30:49 2010] [debug] mod_authnz_ldap.c(376): [client 192.168.0.107] [32596] auth_ldap authenticate: using URL ldap://ldap.example.com/ou=user,dc=example,dc=com?uid?sub?(objectclass=posixAccount)
[Tue Sep 14 16:30:50 2010] [debug] mod_authnz_ldap.c(475): [client 192.168.0.107] [32596] auth_ldap authenticate: accepting alice
[Tue Sep 14 16:30:50 2010] [debug] mod_authnz_ldap.c(842): [client 192.168.0.107] [32596] auth_ldap authorise: declining to authorise

The error message is “declining to authorise” as compare to “authorisation denied” in previous case.

In this case, mod_authnz_ldap should attempt to perform authorisation due to “AuthzLDAPAuthoritative  on” clause in configuration.  Again, the reason it “declining to authorise” was due to this clause:

Require valid-user

In this case, mod_authnz_ldap should perform authorisation but valid-user.  However, mod_authnz_ldap do not possess “Require valid-user” and thus it doesn’t know know how to perform authorisation and that lead to “declining to authorise” message logged.

To make mod_authnz_ldap perform authorisation successfully, we may use either:

  1. Require ldap-user
  2. Require ldap-group
  3. Require ldap-dn
  4. Require ldap-attribute
  5. Require ldap-filter

for different cases.  Refer here for more information.

Configuration: WebDAV

mod_dav is the module for HTTPD WebDAV.  it is extremely easy to use WebDAV in Apache HTTPD:

<Location /foo>
  Dav On
</Location>

Just include “Dav On” to Location or Directory block will straight turn on WebDAV share.

Reference

  1. Making Apache 2.2 valid-user work with mod_authnz_ldap.
    URL: http://neptune.ashtech.net/~dmarkle/blog/archives/108-Making-Apache-2.2-valid-user-work-with-mod_authnz_ldap.html
Thursday, September 09, 2010

CVS: Web GUI by FreeBSD CVSweb

Introduction

CVSweb is a WWW interface for CVS repositories with which you can browse a file hierarchy on your browser to view each file's revision history in a very handy manner.

Installation

# Web interface for CVS repositories 
yum install cvsweb

# Runtime Logging for C++ 
yum install rlog

# Revision Control System (RCS) file version management tools 
yum install rcs

# CVS/RCS repository grapher 
yum install cvsgraph

# A plain ASCII to PostScript converter 
yum install enscript

Configuration: Repository

Update the repository setting in CVSweb configuration file:

vi /etc/cvsweb/cvsweb.conf
@CVSrepositories = (
      'local'   => ['Local Repository', '/var/cvs'],
#       'freebsd' => ['FreeBSD',          '/var/ncvs'],
#       'openbsd' => ['OpenBSD',          '/var/ncvs'],
#       'netbsd'  => ['NetBSD',           '/var/ncvs'],
#       'ruby'    => ['Ruby',             '/var/anoncvs/ruby'],
);

Configuration: Web Server

CVSweb is a cgi program runs on Apache, the Apache configuration should configuration similar to this:

ScriptAlias /cgi-bin/ "/var/www/cgi-bin/"

Make sure the CVSweb cgi is place in the path specify in ScriptAlias.

Configuration: Syntax Highlighter

The syntax highlighter works if enscript package is installed. CVSweb keep the enscript configuration in /etc/cvsweb/cvsweb.conf.

The following example specify Delphi as syntax highlighter for pascal (.pas) file.

vi /etc/cvsweb/cvsweb.conf
%enscript_types =
(
 'ada'          => qr/\.ad(s|b|a)$/o,
 'asm'          => qr/\.[Ss]$/o,
 'awk'          => qr/\.awk$/o,
 'bash'         => qr/\.(bash(_profile|rc)|inputrc)$/o,
 'c'            => qr/\.(c|h)$/o,
 'changelog'    => qr/^changelog$/io,
 'cpp'          => qr/\.(c\+\+|C|H|cpp|cc|cxx)$/o,
 'csh'          => qr/\.(csh(rc)?|log(in|out)|history)$/o,
 'elisp'        => qr/\.e(l|macs)$/o,
 'fortran'      => qr/\.[fF]$/o,
 'haskell'      => qr/\.(l?h|l?g)s$/o,
 'html'         => qr/\.x?html?$/o,
 'idl'          => qr/\.idl$/o,
 'inf'          => qr/\.inf$/io,
 'java'         => qr/\.java$/o,
 'javascript'   => qr/\.(js|pac)$/o,
 'ksh'          => qr/\.ksh$/o,
 'm4'           => qr/\.m4$/o,
 'makefile'     => qr/(GNU)?[Mm]akefile(?!\.PL\b)|\.(ma?ke?|am)$/o,
 'matlab'       => qr/\.m$/o,
 'nroff'        => qr/\.man$/o,
 'delphi'       => qr/\.p(as|p)?$/io,
 'perl'         => qr/\.p(m|(er)?l)$/io,
 'postscript'   => qr/\.e?ps$/io,
 'python'       => qr/\.py$/o,
 'rfc'          => qr/\b((rfc|draft)\..*\.txt)$/o,
 'scheme'       => qr/\.(scm|scheme)$/o,
 'sh'           => qr/\.sh$/o,
 'skill'        => qr/\.il$/o,
 'sql'          => qr/\.sql$/o,
 'states'       => qr/\.st$/o,
 'synopsys'     => qr/\.s(cr|yn(th)?)$/o,
 'tcl'          => qr/\.tcl$/o,
 'tcsh'         => qr/\.tcshrc$/o,
 'tex'          => qr/\.tex$/o,
 'vba'          => qr/\.vba$/o,
 'verilog'      => qr/\.(v|vh)$/o,
 'vhdl'         => qr/\.vhdl?$/o,
 'vrml'         => qr/\.wrl$/o,
 'wmlscript'    => qr/\.wmls(cript)?$/o,
 'zsh'          => qr/\.(zsh(env|rc)|z(profile|log(in|out)))$/o,
);

Using CVSweb

Launch your favorite web browser and navigate to

http://<cvs-host>/cgi-bin/cvsweb.cgi

Troubleshoot: CVS folders doesn’t show up

The CVS folder specify in local repository of cvsweb.conf may not have appropriate access permission for cvsweb.cgi. You may use the following command to change the folder permission:

chmod o+rx <cvs-folder>

Troubleshoot: Encounter permission denied when browse a CVS tree

A CVS repository tree may contain arbitrary levels of folder. The tree may not have appropriate access permission for cvsweb.cgi. You may use the following command to change all the sub folders found in CVS repository:

find . -type d -exec chmod o+rx '{}' \;

Reference

  1. FreeBDS CVSweb Project. URL: http://www.freebsd.org/projects/cvsweb.html
Wednesday, September 08, 2010

CVS: Branching, Merging and Tagging

Introduction

CVS a.k.a. concurrent version system is the software version control in the field of software development.  Branching and Merging features in CVS allow developer to manage same piece of source file for several release and develop these release in parallel without interrupting each others.

Please note that the examples shown below are using WinCVS 1.2.

CVS Branching

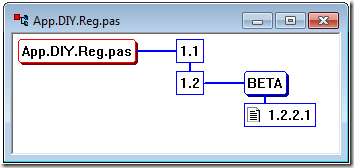
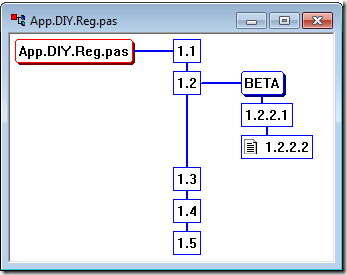
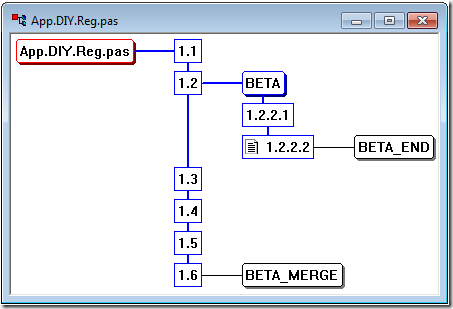
For example, I have a file in CVS repository: App.DIY.Reg.pas.  The latest version for the file is 1.2 (The graph view is triggered with Ctrl+G Graph Selection):

1

Let look at the following scenario to see how could CVS branching manage the case:

I would like to make changes to a file.  These new changes is not yet ready for release to public. It may stay in CVS repository as internal or beta version for some time.  It will merge with main branch of the source file until it is mature.  However, the main branch may change due to bugs reported during the beta release period.  The bug fixed in main branch may merge with sub branch too during the beta release period.

The main trunk of a file in CVS is termed as “HEAD”.  You should define a meaningful name or tag to other branches but not the “HEAD” tag.  “HEAD” a reserve tag for main trunk.

Let us make some changes to local working versio of the file.  It will turn to red color once I make some changes:

2

The new changes is not ready for main release yet.  I am going to create a branch call BETA in version 1.2.  Please note that branch tag is case sensitive.

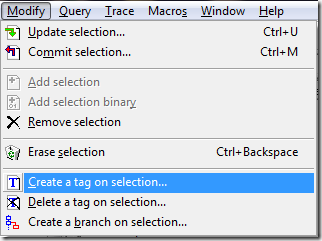
There are 2 ways to create a branch:

  1. Access via main menu.  Modify | Create a branch on selection... :

    4
  2. Click the Fork Selection of Tags tool bar icon:

    3

A windows with title “Create branch settings” prompt out:

5

Enter branch name and press OK button to create a “BETA” branch for the file.  We will leave an option “Check that the files are unmodified before branching” unchecked in this case.

The version of the file in graph view has a BETA branch shown:

6

Now everything seems ready and we are going to commit the local changes to BETA branch.  We will in trouble if we commit the changes now.  The changes we commit will stay in main trunk as version 1.3:

8

This is due to the sticky tag for the file in local copy is not mark as “BETA” tag.  It simply means we are working with the copy of main trunk in our local repository.  Whatever changes we commit will stay with main trunk:

7

We may update our local copy stick with "BETA” tag with CVS Update Selection:

9

Enter the stick tag “BETA” and press OK button to update your copy of file as BETA.

A

You will notice there is a tag BETA stick to the file after Update Selection.  Commit the local changes now and it will shown in BETA branch.  Please note also the file revision will update to 1.2.2.1 in this case:

B

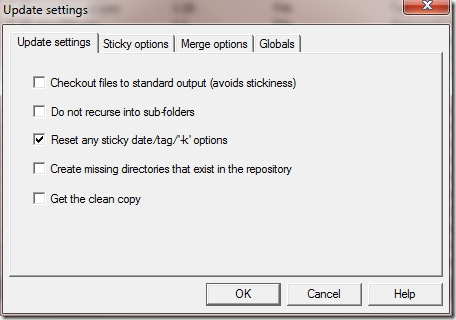
We may remove the sticky tag and back to main trunk by checking an option “Reset any sticky date/tag/’-k' options” in Update Selection:

C

The local copy will become version 1.2 in this case:

D

We may always switch between HEAD and BETA branch by:

  1. “Reset any sticky date/tag/’-k' options” in Update Selection
  2. Retrieve rev./tag/branch of Stick options in Update Selection

respectively.

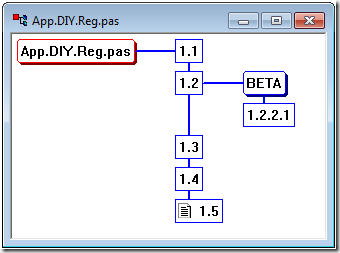
Now, assume we have another local working copy of the source with version 1.2 and empty sticky tag (a.k.a main trunk).  Perform Update Selection to this file will remain as 1.2.  It won’t update to 1.2.2.1 of BETA branch. unless we update the sticky tag to BETA.  We may continue making changes to version 1.2 and commit it as version 1.3, 1.4 or 1.5 and so:

E

CVS Merging

Let us back to version 1.2.2.1 of BETA branch.  We decided to merge the changes of 1.5 in main trunk to 1.2.2.1 of BETA branch.

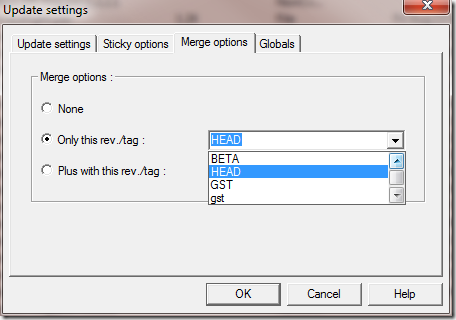
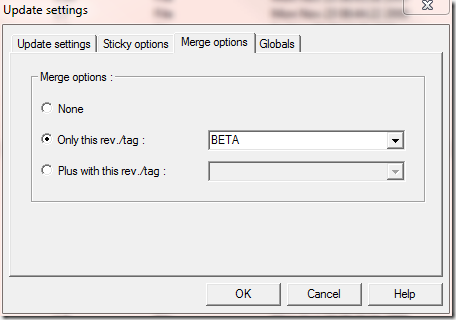
Use the “Merge options” of Update Selection to merge main trunk into BETA branch:

F

Press OK button to proceed the merge operation.  Your local copy will then merge with main trunk.  You may decide to commit under BETA branch.  The following graph shows the result of commit work:

G

Now we decide to end the BETA branch and merge all changes from BETA branch to main trunk.  Let’s back to main trunk copy and perform the merging work:

H

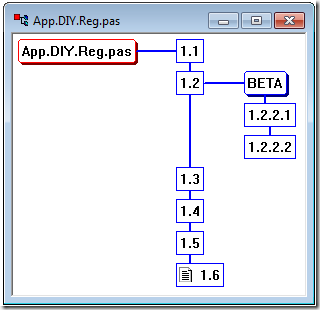
After commit the changes, CVS repository will have the following version:

I

The version 1.6 is result of the merge of 1.5 in main trunk and 1.2.2.2 BETA branch.

CVS Tagging

CVS tagging allows you to mark an indication to a file for future reference.  A common usage for tagging is tag the source files with release or build number for future reference.  You may check out particular tag of source files for debugging purpose in future.

Here, we continue with CVS branching and merging example to use the CVS tagging feature to mark both 1.2.2.2 and 1.6 as “BETA_END”  and “BETA_MERGE” respectively.

To tag a version, use either:

  1. Access via main menu.  Modify | Create a tag on selection... :

    M
  2. Click the Tag Selection of Tags tool bar icon:

    L

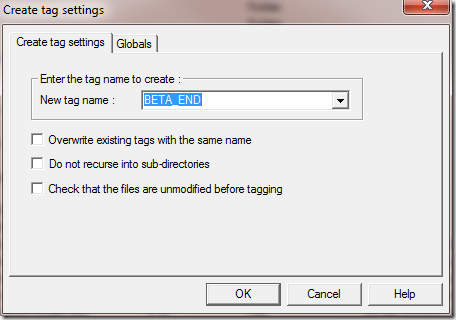
A windows with title “Create tag settings” prompt out:

K

The following graph show the result of tagging:

J

The tagging is for reference only.  Remember that version 1.2.2.2 still exist in the CVS repository.  We may always go back to it anytime.

Working with main trunk and branch together in difference folders

When we start using branch in CVS repository, there may be a need to work with main trunk and difference branches together in same machine.  Check out a local copy from main trunk is easy:  Just check out as usual without any sticky tag.

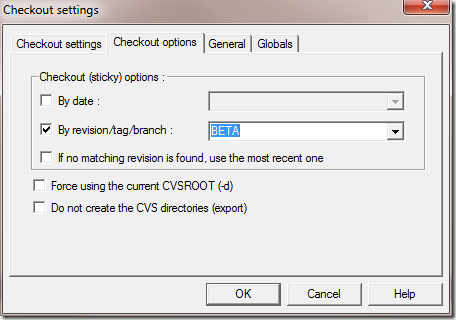
Check out a local copy from branch may need extra care.  In real world example, only some of the source files may have branch.  Majority of source files may not have branch or already merge to main trunk.  If we check out a module with sticky options:

N

You will only get files with BETA tag:

O

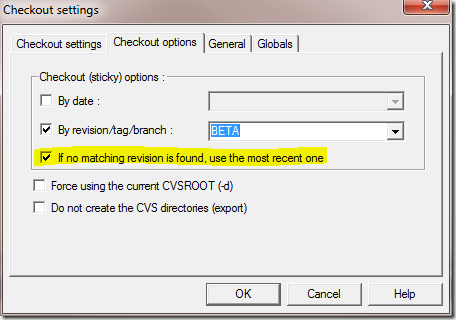
This is not what we want in most situation.  We still need other files from main trunk in order to build a complete BETA release.  To check out the files from main trunk, check the option “If no matching revision is found, use the most recent one” :

P

Press the OK button and the local source copy will have:

Q

The same usage is also applicable to Update Selection.

Now, you will see all files in your local copy have BETA sticky tag.  However, this doesn’t mean all files have BETA branch in CVS repository.  In the example, only App.DIY.Reg.pas has BETA branch and the rest are not.  This always confuse the CVS user.

Now, if you make changes to a file App.DIY.pas and you decide to put it in BETA branch.  If you attempt to commit the local changes in this example, you will encounter:

cvs commit: file `App.DIY.pas' had a conflict and has not been modified
cvs [commit aborted]: correct above errors first!

This is due to App.DIY.pas doesn’t has BETA branch in CVS repository, you have to create a new BETA branch for it first before you can commit.  Refer to CVS Branching in early section of this article.