Monday, April 04, 2016

Sisulizer

Installation

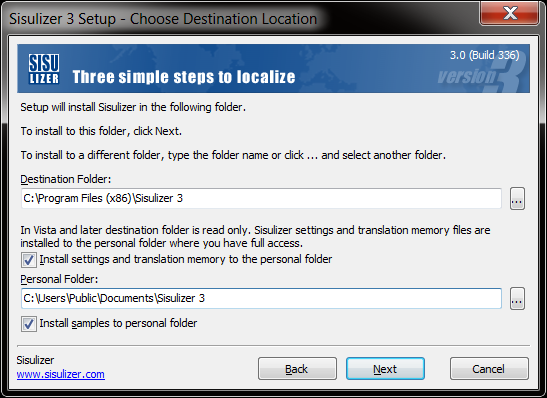
Sisulizer prompt for Personal folder to install the Sisulzer sample project files during installation. To allow public access of the sample project files, enter C:\Users\Public\Documents\Sisulizer 3 in Personal Folder text box:

Configuration

Translation Engine - Microsoft Translator

Sisulizer supports translation using translator engine. Most of the online translators are paid service. Microsoft Translator, however, is free to some extend.

Use Tools | Translation Engines... to configure translation engine:

Microsoft Translator provides 2,000,000 Characters free of charge per month. Charged subscription is available for additional characters translation.

Follow these steps to use Microsoft Translator in Sisulizer:

  1. Sign up Windows Azure Marketplace.
  2. Subscribe Microsoft Translator. e.g.: Subscribe 2,000,000 Characters/month for free.
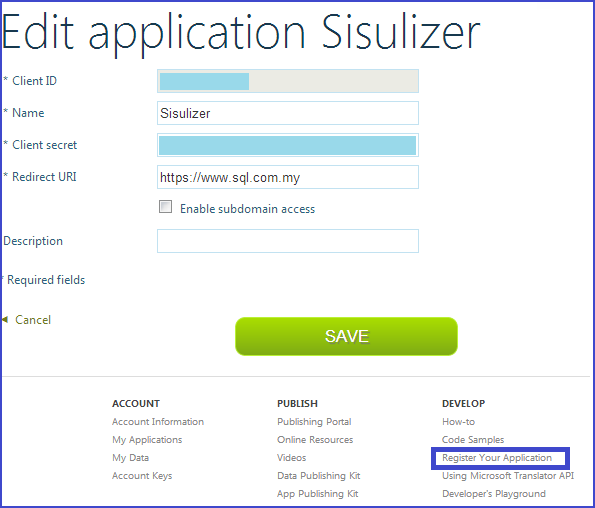
  3. Click Register Your Application at the bottom of your Windows Azure Account for Sisulizer application:
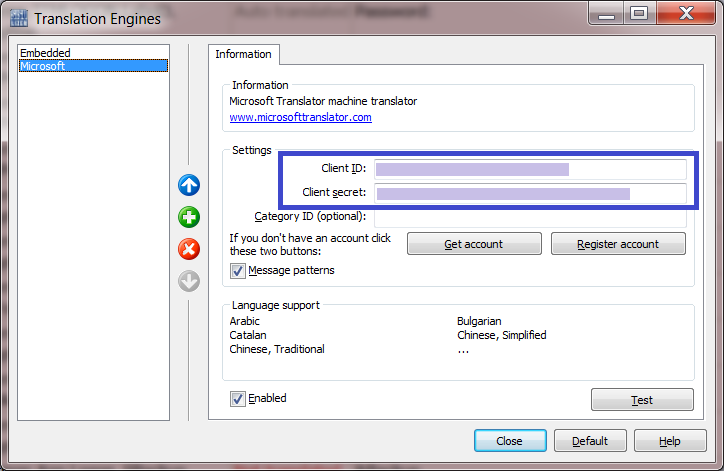
  4. Start Sisulizer, open Tools | Translation Engines… to add Microsoft Translation Engine:
  5. Enter Client id and Client secret accordingly. You may also use the Register Account button in Sisulizer to register Sisulzer to your Windows Azure account:

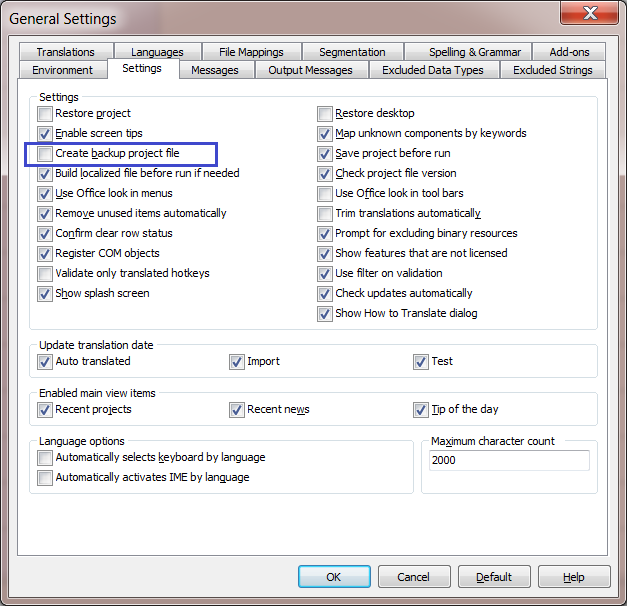
Disable Create Backup project File

Localized Delphi Application

  1. Open Sisulizer project wizard: File | New...
  2. Select Source Type: Localize a file or files

  3. Select File. Select an executable binary file. e.g.: .EXE, .BPL or .DLL

  4. Select File Format: Delphi binary file
  5. Select Windows resource types
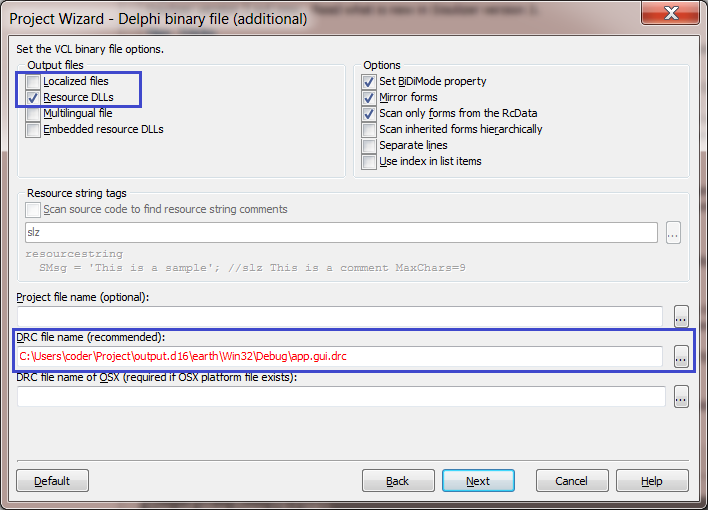
  6. Set additional VCL option:
    1. Unset Localized files
    2. Set Resource DLLs
    3. Set DRC file name
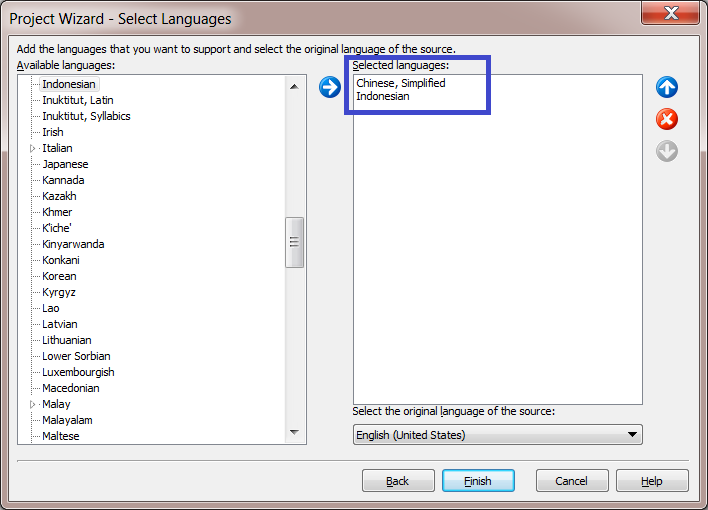
  7. Select languages:

  8. Click Finish button to close project wizard.

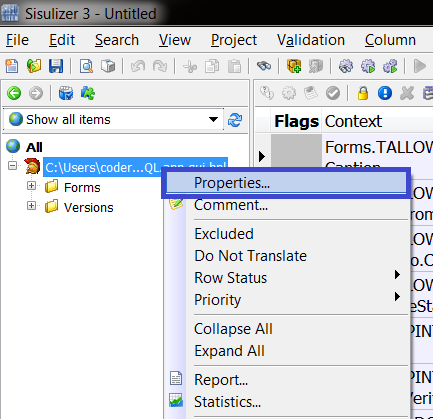
  9. Open project properties:

    1. Set Resource DLLs file name template as . (ISO hyphen language code):

    2. Set Ignore Form Scaling in VCL options page:

    3. Start localization process by using manual translation or translation engine.

  10. Build project to produce resource DLL files:

Tuesday, December 15, 2015

Sisulizer

Installation

Sisulizer prompt for Personal folder to install the Sisulzer sample project files during installation. To allow public access of the sample project files, enter C:\Users\Public\Documents\Sisulizer 3 in Personal Folder text box:

Configuration

Translation Engine - Microsoft Translator

Sisulizer supports translation using translator engine. Most of the online translators are paid service. Microsoft Translator, however, is free to some extend.

Use Tools | Translation Engines... to configure translation engine:

Microsoft Translator provides 2,000,000 Characters free of charge per month. Charged subscription is available for additional characters translation.

Follow these steps to use Microsoft Translator in Sisulizer:

  1. Sign up Windows Azure Marketplace.
  2. Subscribe Microsoft Translator. e.g.: Subscribe 2,000,000 Characters/month for free.
  3. Click Register Your Application at the bottom of your Windows Azure Account for Sisulizer application:
  4. Start Sisulizer, open Tools | Translation Engines… to add Microsoft Translation Engine:
  5. Enter Client id and Client secret accordingly. You may also use the Register Account button in Sisulizer to register Sisulzer to your Windows Azure account:
  6. Check Enabled to enable the translator engine
  7. If there are some network activities prohibit the checked Enabled, a workaround is disable network devices, Checked Enable and re-enable network devices.

Disable Create Backup project File

Localized Delphi Application

  1. Open Sisulizer project wizard: File | New...
  2. Select Source Type: Localize a file or files

  3. Select File. Select an executable binary file. e.g.: .EXE, .BPL or .DLL

  4. Select File Format: Delphi binary file
  5. Select Windows resource types
  6. Set additional VCL option:
    1. Unset Localized files
    2. Set Resource DLLs
    3. Set DRC file name
  7. Select languages:

  8. Click Finish button to close project wizard.

  9. Open project properties:

    1. Set Resource DLLs file name template as . (ISO hyphen language code):

    2. Set Ignore Form Scaling in VCL options page:

    3. Start localization process by using manual translation or translation engine.

  10. Build project to produce resource DLL files:

Friday, December 04, 2015

Delphi - Multi threading

Introduction

A classical approach of implementing multi-threading in application is using TThread.

New Parallel Programming Library has introduced In recent version of RAD Studio with TParallel.For and TTask classes.

Rules and Restrictions

Keep in mind of the following rules and restrictions when programming multithreading application:

  1. Avoid sharing resources (variables or objects) among thread that may change in threading operation. It will cause unexpected errors. Use TInterlocked or TThread.Synchronize when necessary.
  2. VCL or FMX libraries are not thread safe. Most GUI updates performed by thread shall invoke TThread.Synchronize or TThread.Queue.

System.Classes.TThread

In most situation, operation that want to perform in thread shall define in TThread descendant and override TThread.Execute method.

TThread.CreateAnonymousThread

TThread.CreateAnonymousThread is a class method allow the creation of simple task embed in an anonymous method to run in thread without the hazard to define a TThread descendant.

TThread.ProcessorCount

TThread.ProcessorCount is a property that return the number of virtual CPU cores of the runtime process in operating system. It may serves as a base measurement for application to determine total number of simultaneous running threads in a process.

TThread.Synchronize

TThread.Synchronize execute codes in main thread if thread safe manner is a concern. TThread.Synchronize is blocked until finish execution in the thread.

TThread.Queue

TThread.Queue works similar to TThread.Synchronize in thread safe manner with blocking execution in the executing thread.

System.Threading.pas

Parallel Programming Library introduced in RAD Studio are defined in unit System.Threading.pas.

TParallel

TParallel.&For method allow us to run a thread method in loop manner by a range of low and high bound.

TTask

In addition to TParallel, class TTask can be invoke for a more diversified job. One TTask.Run for one job to run in parallel. System shall take care of resource allocation when a significant number of TTask.Run was invoked.

Each TTask job return a ITask reference. If sequence of executed task is important for later operation, use TTask.WaitForAll or TTask.WaitForAny to check the task status first.

TThreadPool

The number of executing thread tasks is determined by available number of virtual CPU core (TThread.ProcessorCount). The behaviour may alter by introducing a new TThreadPool instance with new MaxWorkerThreads and MinWorkerThreads value to TTask or TParallel methods.

By default, MaxWorkerThreads and MinWorkerThreads has these value:

FMinLimitWorkerThreadCount := TThread.ProcessorCount;
FMaxLimitWorkerThreadCount := TThread.ProcessorCount * MaxThreadsPerCPU;

Use TThreadPool.SetMaxWorkerThreads and TThread.SetMinWorkerThreads method to adjust both worker values. TThreadPool.SetMaxWorkerThreads shall invoke prior to TThreadPool.SetMinWorkerThreads to avoid the restriction enforced in the method:

var Pool: TThreadPool;
begin
  Pool := TThreadPool.Create;
  Pool.SetMaxWorkerThreads(500);
  Pool.SetMinWorkerThreads(200);
  ...
end;

TInterlocked class

TInterlocked implements various common atomic opererations for the purpose of ensuring “thread” or “multi-core” safety when modifying variables that could be accessed from multiple threads simultaneously. The TInterlocked class is not intended to be instantiated nor derived from. All the methods are “class static” and are merely defined in a class as a way to group their like-functionality

TInterlocked provide some class methods to let user change variable of simple data type (e.g.: Integer or Int64) in a thread with thread-safe manner:

var iCount: Integer;
begin
  iCount := 0;
  TParallel.&For(1, 10,
    procedure (Current: Integer)
    begin
      TInterlocked.Add(iCount, Current);
    end
  );
end;

The above code return iCount accumulated in threads with thread-safe manner. Each TInterlocked invokes ensure ONLY ONE thread task access variable iCount.

Freeze when use TThread.Synchronize with TParallel or TTask.WaitForAll

It is a common practice to update GUI control from a running thread to update status periodically using TThread.Synchronize method when the GUI controls are not thread-safe (e.g.: VCL or FMX controls).

Both TParallel and TTask.WaitForAll are blocked and wait for a list of tasks to finish, invoke TThread.Synchronize that blocked natively in thread will make the process freeze forever. For example:

  TParallel.&For(1, 1,
    procedure (Current: Integer)
    begin
      TThread.Synchronize(nil,
        procedure
        begin
          Application.MainForm.Caption := Current.ToString;
        end
      );
    end
  );
var TaskList: TList<ITask>;
    i: Integer;
    T: ITask;
begin
  TaskList := TList<ITask>.Create;

  for i := 1 to 10 do begin
    T := TTask.Run(
      procedure
      begin
        TThread.Synchronize(nil,
          procedure
          begin
            Application.MainForm.Caption := GetTickCount.ToString;
          end
        );
      end
    );
    TaskList.Add(T);
  end;
  TTask.WaitForAll(TaskList.ToArray);
  ...
end;

Use TThread.Queue instead to avoid the blocking:

  TParallel.&For(1, 1,
    procedure (Current: Integer)
    begin
      TThread.Queue(nil,
        procedure
        begin
          Application.MainForm.Caption := Current.ToString;
        end
      );
    end
  );
var TaskList: TList<ITask>;
    i: Integer;
    T: ITask;
begin
  TaskList := TList<ITask>.Create;

  for i := 1 to 10 do begin
    T := TTask.Run(
      procedure
      begin
        TThread.Queue(nil,
          procedure
          begin
            Application.MainForm.Caption := GetTickCount.ToString;
          end
        );
      end
    );
    TaskList.Add(T);
  end;
  TTask.WaitForAll(TaskList.ToArray);
  ...
end;

The following answer explain the mechanism works behind that cause the frozen:

When you call TThread.Synchronize the thread and method pointer are added to a global SyncList: TList in Classes.pas. In the main exe’s TApplication.Idle routine calls CheckSynchronize, which checks the SyncList, … End result, your synchronized methods are never called.

Using TThread.Synchronize with TTask.WaitForAll

If using blocking TThread.Synchronize is necessary in thread (e.g.: Waiting response from end user), using TTask.WaitForAll will freeze the application. Consider using CheckSynchronize() in a timeout TTask.WaitForAll loop to process TThread.Synchronize request:

var TaskList: TList<ITask>;
    i: Integer;
    T: ITask;
begin
  TaskList := TList<ITask>.Create;

  for i := 1 to 10 do begin
    T := TTask.Run(
      procedure
      begin
        TThread.Synchronize(nil,
          procedure
          begin
            Application.MainForm.Caption := GetTickCount.ToString;
          end
        );
      end
    );
    TaskList.Add(T);
  end;

  while not TTask.WaitForAll(TaskList.ToArray, 500(* TimeOut *)) do begin
    // process any pending TThread.Synchronize() and TThread.Queue() requests
    CheckSynchronize(0);

    // process any pending UI paint requests, but not other messages
    Application.MainForm.Update;

    // or make it more responsive
    Application.ProcessMessages;
  end;
  ...
end;

Passing dynamic resources to parallel tasks

Dynamic resources refer to variables, class instances, records or other means that are to be decided at runtime.

Due to the class design of TParallel.&For and TTask.Run. It is almost impossible to pass complex resources to the task for parallel execution. TParallel.&For shed light on this problem by an Integer index the task defined in TProc<Integer>. However, this is not enough for complex problem domain that are difficult to decide the lower and upper bounds. For example, execute task in parallel for each rows in a uni-directional TDataSet with unknown record count:

var D: TDataSet;  // D is uni-directional dataset
begin
  TParallel.&For(1, D.RecordCount,
    procedure (Index: Integer)
    begin
      D.RecNo := Index;
      (* Perform some task *)
    end
  );
end;

The above code is problematic to work in TParallel.&For with two problems:

  1. Uni-directional dataset fail with D.RecordCount.
  2. Changing D.RecNo in thread will cause conflict and confuse other thread’s execution.

A simple solution is introduced a queue (or more precisely, a thread-safe queue, e.g.: TThreadedQueue<T>) to enqueue resources required in task and dequeue the resource from task:

var D: TDataSet;  // D is uni-directional dataset
    Q: TThreadedQueue<TData>;
    T: ITask;
    TaskList: TList<ITask>;
    Data: TData;
begin
  Q := TThreadedQueue<TData>.Create(TThread.ProcessorCount (* Init queue size *));
  TaskList := TList<ITask>.Create;

  D := Create_Uni_Directional_DataSet;
  D.Open;

  while not D.Eof do begin
    Data := CreateDataFromDataSet(D);
    Q.PushItem(Data);
    T := TTask.Run(
      procedure
      var A: TData;
      begin
        A := Q.PopItem;
        (* Perform some task on A *)
        ...
      end
    );

    TaskList.Add(T);
    D.Next;
  end;
  ...
end;

Tips

TThreadedQueue<T>.PopItem is blocked when the queue is empty. This behaviour frees our worry when PopItem from the queue in a thread. The thread will be blocked till item is available from the queue.

Running a number of tasks in parallel with limited resources

Some resources are limited or expensive to define in runtime. For example, database connections or remote connections.

Imagine there are a large number of tasks that plan to work in parallel and each task requires an independent resource to work with (e.g.: database connection). One may code in this way:

var D: TDataSet;  // D is uni-directional dataset
    Q: TThreadedQueue<TData>;
    T: ITask;
    TaskList: TList<ITask>;
    Data: TData;
begin
  Q := TThreadedQueue<TData>.Create(TThread.ProcessorCount);
  TaskList := TList<ITask>.Create;

  D := Create_Uni_Directional_DataSet;
  D.Open;

  while not D.Eof do begin
    Data := CreateDataFromDataSet(D);
    Q.PushItem(Data);
    T := TTask.Run(
      procedure
      var A: TData;
          C: TDatabaseConnection;
      begin
        C := TDatabaseConnection.Create(...);
        A := Q.PopItem;
        C.Execute(A); (* Perform some task on A *)
        C.Free;
      end
    );

    TaskList.Add(T);
    D.Next;
  end;
  ...
end;

The code attempt to create an equal numbers of database connection dataset record. It is expensive and impractical to design in this approach.

There is a solution for the problem. Since tasks running in parallel is limited by TThreadPool.MinWorkerThreads, we can define a resource pool that is large enough and consume in round-robin manner.

For example, there are 100 tasks to be executed in parallel but at any one time no more than 4 tasks are executing due to limited CPU cores. We may define 8 or more resources in a pool and each task will pick a resource for execution:

Task 1 use Resource 1
Task 2 use Resource 2
Task 3 use Resource 3
Task 4 use Resource 4
Task 5 use Resource 5
Task 6 use Resource 6
Task 7 use Resource 7
Task 8 use Resource 8
Task 9 use Resource 1
Task 10 use Resource 2
...

The scenario assumes these tasks run smoothly in sequence ideally. However, it is not the case in real runtime environment. The operating system cannot guarantee threaded tasks run or finish in the order it queue.

Let’s try to design a simple workflow:

  1. Define a pool work like queue to hold resources
  2. Enqueue resources to the queue pool
  3. For each running task, dequeue a resource for consumption
  4. For each running task, enqueue the resource back to queue pool for next consumption
var D: TDataSet;  // D is uni-directional dataset
    Q: TThreadedQueue<TData>;
    Pool: TThreadedQueue<TDatabaseConnection>;
    T: ITask;
    TaskList: TList<ITask>;
    Data: TData;
    i: Integer;
begin
  Q := TThreadedQueue<TData>.Create(TThread.ProcessorCount * 2);
  TaskList := TList<ITask>.Create;

  Pool := TThreadedQueue<TDatabaseConnection>.Create(TThread.ProcessorCount);
  for i := 1 to TThread.ProcessorCount do
    Pool.PushItem(TDatabaseConnection.Create());

  D := Create_Uni_Directional_DataSet;
  D.Open;

  while not D.Eof do begin
    Data := CreateDataFromDataSet(D);
    Q.PushItem(Data);
    T := TTask.Run(
      procedure
      var A: TData;
          C: TDatabaseConnection;
      begin
        // Get a resource from pool
        C := Pool.PopItem;

        // Perform job using the resource
        A := Q.PopupItem;
        C.Execute(A); (* Perform some task on A *)

        // Finish. Push the resource back to pool
        Pool.PushItem(C);
      end
    );

    TaskList.Add(T);
    D.Next;
  end;
  ...
end;

This design shall works as long as at any single time there is resource available in pool for each running task.

Collect exceptions raised in threaded tasks

If exception happens in threaded tasks:

var i: Integer;
    TaskList: TList<ITask>;
begin
  TaskList := TList<ITask>.Create;

  for i := 1 to 50 do begin
    TaskList.Add(
      TTask.Run(
        procedure
        begin
          if Random(10) mod 5 = 0 then
            raise Exception.Create('Error Message');
        end
      )
    );
  end;

  TTask.WaitForAll(TaskList.ToArray);

  TaskList.Free;
end;

A message dialog prompt a message

one or more errors occurred

without much detail information.

The exception raised is an instance of class EAggregateException. The exception is easy to capture with a simple try..except..endconstruct:

var X: Exception;
    i: Integer;
    TaskList: TList<ITask>;
begin
  TaskList := TList<ITask>.Create;
  try
    for i := 1 to 50 do begin
      TaskList.Add(
        TTask.Run(
          procedure
          begin
            if Random(10) mod 5 = 0 then
              raise Exception.Create('Error Message');
          end
        )
      );
    end;

    try
      TTask.WaitForAll(TaskList.ToArray);
    except
      on E: EAggregateException do begin
        for X in E do begin
          OutputDebugString(PChar(X.Message));
        end;
      end;
    end;

  finally
    TaskList.Free;
  end;
end;

There is a significant different between TParallel.&For and TTask.Run handing exception.

If exception happens in the middle of TParallel.&For, it stop immediately without queuing more threaded task. it works in the manner is due to TParallel.&For is blocked during execution.

TTask.Run, on the other hand doesn’t block during execution. Exception occurs in a particular ITask instance doesn’t stop other ITask instance. The best spot to capture exceptions from ITask reference is via TTask.WaitForAll(...);

Information from Future

TTask.Future<T> defines a threaded task that return a generic IFuture<T> reference. Once the threaded task complete execution, it’s value return via IFuture<T>.Value is ready for reference:

var Msg: IFuture<string>;
begin
  Msg := TTask.Future<string>(
           function: string
           begin
             Sleep(2000);
             Result := 'Message from future';
           end
         );

  ShowMessage(Msg.Value);
end;

In the example, ShowMessage(Msg.Value) is blocked until Msg task complete it’s execution.

Cancel running threaded task if exception raised

To cancel running threaded task if exception raised is applicable to TTask.Run usage only. It doesn’t apply to TParallel.&For which is blocked during execution.

TTask.Run is unblocked during execution. It is not easy to cancel other running ITask instance if exception happens in any of the ITask instance. The solution I can think of so far is:

  1. Keep all ITask instances reference to a list
  2. If exception happen to a particular ITask execution, notify for a exhaustive checking for of ITask instances in the list.
  3. For each ITask instance, cancel ITask if still running

Remove completed ITask instance reference from task list

A straight solution is perform WaitForAll for all tasks and remove from task list later:

var TaskList: TList<ITask>;
begin
  TaskList := TList<ITask>.Create;
  for i := 1 to 1000 do begin
     TaskList.Add(
       TTask.Run(
         procedure 
         begin
           ...
         end
       )
     );
  end;
  TTask.WaitForAll(TaskList.ToArray);
  TaskList.Clear;
  ...
  TaskList.Free;
end

However, if the ITask instance reference grow (e.g.: 50,000,000 to be stored in TaskList), system shall raise Out of Memory exception.

A solution is introducing a cleaning of ITask reference in batch (e.g.: Perform WaitForAll for every 100,000 ITask reference).

First define a method in TThreadedQueue<TArray<ITask>> to perform threaded WaitForAll for tasks:

type
  TThreadedTasksQueue_Helper = class helper for TThreadedQueue<TArray<ITask>>
  public
    function WaitForAll(const aTasks: TArray<ITask>): IFuture<Integer>;
  end;

function TThreadedTasksQueue_Helper.WaitForAll(const aTasks: TArray<ITask>): IFuture<Integer>;
begin
  PushItem(aTasks);

  Result := TTask.Future<Integer>(
    function: Integer
    var A: TArray<ITask>;
    begin
      A := PopItem;
      TTask.WaitForAll(A);
      Result := Length(A);
    end
  );
end;

Each WaitForAll batch of 100,000 tasks (IFuture<Integer>) shall keep in a list (Batches: TList<IFuture<Integer>>) first. Remember there should have balance tasks in TaskList not able to group in 100,000 per batch after the lengthy for loop.

Finally, query the each batch’s value (Batch.Value) to make sure all tasks ended properly.

var i: Integer;
    Q: TThreadedQueue<Integer>;
    Batches: TList<IFuture<Integer>>;
    Batch: IFuture<Integer>;
    WaitForQ: TThreadedQueue<TArray<ITask>>;
    TaskList: TList<ITask>;
begin
  Q := TThreadedQueue<Integer>.Create;
  WaitForQ := TThreadedQueue<TArray<ITask>>.Create;
  Batches := TList<IFuture<Integer>>.Create;
  TaskList := TList<ITask>.Create;

  for i := 1 to 50000000 do begin
    Q.PushItem(i);
    TaskList.Add(
      TTask.Run(
        procedure
        begin
          Q.PopItem;
        end
      )
    );

    if i mod 100000 = 0 then begin
      Batches.Add(WaitForQ.WaitForAll(TaskList.ToArray));
      TaskList.Clear;
    end;
  end;

  Batches.Add(WaitForQ.WaitForAll(TaskList.ToArray));
  TaskList.Clear;

  for Batch in Batches do Batch.Value;

  Q.Free;
  WaitForQ.Free;
  TaskList.Free;
  Batches.Free;
end;

Reference

  1. stackoverflow.com: Synchronize() hangs up the thread
  2. stackoverflow.com: Delphi TTask WaitForAll vs. Synchronise
  3. Rob’s Technology Corner: PPL - TTask an example in how not to use.
Sunday, October 14, 2012

Retrieve credential values stored in WiFi device

Introduction

When setup a WiFi network using network appliances, an account credential is always required to logon to network services provided by ISP (Internet Service Provider).  For example, using modem router to access ISP’s broadband internet service. 

The ISP account credentials is usually enter once during configuration at first time and it should persist in the device’s RAM is ready to work for next power on.  Compare ISP account credential with the other account credentials like your email account or desktop OS account that use every day, the user tend to forget or lost the ISP account credential easily.  This happens when we upgrade to new WiFI device or hard reset the device due to some technical issues.

This article introduces some software tools to attempt recover the account credential values store in WiFi device.

Retrieve configuration file from WiFi device

Most WiFI devices allow user to backup the configuration in a file.  Read the user guides of the WiFi device to find out if it has the configuration backup option.

For example, most D-Link WiFi device supports configuration backup via HTTP URL.  Enter URL like:

http://192.168.1.1/config.bin

in browser to download the configuration file.  Most configuration are compressed and encrypted.  Some tools is needed to decode the information stored in the configuration file.

Router Pass View

RouterPassView is a software tool to decode the configuration file retrieved from WiFI router.  Please note that not all WiFi device is supported, refer to the web site for a list of supported device.

It is easy to use RouterPassView.  Download and launch the software, open the configuration file in the software and the configuration information should show in text format:

image

Monday, August 27, 2012

Turn a Windows 7 desktop to Wifi AP via Microsoft Virtual Wifi miniport adapter

Introduction

Windows 7 introduces a new virtual driver for WiFi network that create a virtual WiFi AP to share network / Internet connection for any WiFi device.  The network adapter is named as Microsoft Virtual Wifi miniport adapter.

Before Windows 7, Adhoc wireless connection is a common WiFi connection that may only connect to one WiFi device only.  The Windows Virtual WiFi connection may connect to up 8 WiFi devices.

Check support of Virtual Wifi

The virtual network adapter should install automatically in Device Manager once your WiFi adapter is activated:

image

A new Wireless Network Connection (e.g.: Wireless Network Connection 2 in the following example) should configure as well:

image

Everything is ready up to this stage, continue the configuration to turn on the virtual WiFi AP and start sharing your network connection.

Please note that there is no GUI tools to configure virtual WIFI connection.  All commands should type in command line console under Administrator privilege.

Configure Virtual WiFi connection

Choose a SSID to identify your virtual WIFI AP and set a password for it.  Type the following command in command line console running as administrator to start configure:

C:\Windows\system32>netsh wlan set hostednetwork mode=allow ssid=MyWifi key=password keyUsage=persistent
The hosted network mode has been set to allow.
The SSID of the hosted network has been successfully changed.
The user key passphrase of the hosted network has been successfully changed.

Make sure the physical Wifi adapter is enabled before start the Virtual WiFi connection:

C:\Windows\system32>netsh wlan start hostednetwork
The hosted network started.

The Virtual WiFi connection (MyWifi, in this example) is active:

image

The Virtual WiFi connection is ready to accept connection now.  Use any other WiFi device (Smartphone, other notebook, PC) to check if the MyWifi connection appears the WiFi connection list.

Please note that the virtual WiFi connection does not connect to any Internet connection yet.  All WiFi connection to MyWifi is isolated in the MyWifi network only.

Share Internet connection to Virtual WiFi connection

Enable Internet Connection Sharing for virtual WiFi connection allow Internet traffic be served for virtual WiFi client.  First, identify the network connection with Internet access:

image

Open properties page of the Network Connection with internet access and set the following:

  1. “Allow other network users to connect through this computer’s Internet connection.
  2. Set Home networking connection to “Wireless Network Connection 2” (The connection should be Virtual WiFi Connection).
  3. Click OK to commit changes.

image

The Virtual WiFi connection should have access to Internet now:

image

Other WiFi device connect to virtual WiFi connection should be able to access the Internet immediately.

Virtual Wifi AP not started after reboot

The Windows 7 Virtual WiFi connection is not persisted when machine reboot.  You should start the virtual WiFi connection each time machine has rebooted:

C:\>netsh wlan show hostednetwork

Hosted network settings
-----------------------
    Mode                   : Allowed
    SSID name              : "MyWifi"
    Max number of clients  : 8
    Authentication         : WPA2-Personal
    Cipher                 : CCMP

Hosted network status
---------------------
    Status                 : Not started


C:\>netsh wlan start hostednetwork
The hosted network started.

Stop virtual WiFi connection

Run the command to stop connection:

C:\>netsh wlan stop hostednetwork
The hosted network stopped.

Uninstall virtual WiFi adapter

It is not necessary to uninstall virtual WiFi adapter as the uninstall is not permanent.  The virtual WiFi adapter will be installed once your reboot machine.  If you mean to uninstall the virtual WiFi adapter for current session, try this:

C:\>netsh wlan set hostednetwork mode=disallow
The hosted network mode has been set to disallow.

Side Effect: Unable to access network share after update Microsoft Virtual WiFi Miniport Adapter

There is a side effect if Microsoft Virtual Wifi Miniport Adapter has been updated.  The network share may not be accessed and “0x8004005 Unspecified error” may prompt:

image

This is due to the “Client for Microsoft Networks” service is missing from the network connection.  Reinstall service “Client for Microsoft Networks” will solve the error:

Untitled

Thursday, May 24, 2012

Linux: Disable SELINUX

Introduction

SELINUX may cause some confusion and difficulties when configuring Linux. If any weird problems encounter while configure any of the Linux services (e.g.: Samba, Firewall, ...), we may disable the SELINUX first to check if the problems are related to it.

Fedora 16

In Fedora 16, selinux no longer mount to /selinux.  It has move to /sys/fs/selinux.

  1. Temporary disable SELINUX: echo 0 >/sys/fs/selinux/enforce
  2. Temporary enable SELINUX: echo 1 >/sys/fs/selinux/enforce
  3. Permanently disable SELINUX: edit /etc/selinux/config and change "SELINUX=enforcing" to "SELINUX=disabled"

Fedora 15 or below

  1. Temporary disable SELINUX: echo 0 >/selinux/enforce
  2. Temporary enable SELINUX: echo 1 >/selinux/enforce
  3. Permanently disable SELINUX: edit /etc/selinux/config and change "SELINUX=enforcing" to "SELINUX=disabled"
Reference: How to Disable SELinux

Wednesday, May 02, 2012

Migrate Windows 7 instance to iSCSI target

Introduction

It is straight forward to install a fresh new Windows 7 instance on iSCSI target.  However, there few tricks to migrate a Windows 7 instance to iSCSI target.  Migrating an existing Windows 7 instance is a time consuming process especially for large partition size.  Doing it right will save lot of time.

Prepare Windows 7 disk volume for migration

If a Windows 7 instance has larger partition size, e.g.: Few hundred Giga bytes or Tera bytes, migrate this instance will spend lot of time transfer Windows 7 instance to iSCSI target.  Before start migrate the instance, try shrink or extend the volume size suitable for usage in near future.  Use Extend Volume… and Shrink Volume… function in Disk Management to perform the task:

image

Update Windows 7 network driver

The iSCSI operation rely heavily on the network device.  Update the network driver to latest version is not always necessary but it is advisable to do so.  Some booting process of iSCSI operation may slow down due to network driver’s problem.

Disable LightWeight Filter (LWF)

Disable LightWeight Filter (LWF) is a crucial step to make sure the migration work.  This step must perform or else the SAN boot will fail in later stage.

A Microsoft knowledge article KB967042: Windows may fail to boot from an iSCSI drive if networking hardware is changed describe the cause and solution for the problem.

There is a quick solution to disable LWF by changing some registry setting:

  1. Identify the description of Network Adapter use for iSCSI network operation in later stage:

    image
  2. Start RegEdit in administrator account.
  3. Open HKEY_LOCAL_MACHINE\SYSTEM\CurrentControlSet\Control\ Class\{4D36E972-E325-11CE-BFC1-08002BE10318}. There are many subkeys underneath, find and open the subkey where the DriverDesc match the NIC’s description. e.g.: 0013

    image
  4. Open the subkey Linkage and edit FilterList value:

    image
  5. There are usually two lines in FilterList:
    {0B47BB2C-86FB-4699-8906-E08465757D92}-{B5F4D659-7DAA-4565-8E41-BE220ED60542}-0000
    {0B47BB2C-86FB-4699-8906-E08465757D92}-{B70D6460-3635-4D42-B866-B8AB1A24454C}-0000
  6. Delete the line that refer to LWF driver’s UUID: {B70D6460-3635-4D42-B866-B8AB1A24454C}.  In this case:
    {0B47BB2C-86FB-4699-8906-E08465757D92}-{B5F4D659-7DAA-4565-8E41-BE220ED60542}-0000
    {0B47BB2C-86FB-4699-8906-E08465757D92}-{B70D6460-3635-4D42-B866-B8AB1A24454C}-0000

Migrate Windows 7 disk image to iSCSI target

Next, the Windows 7 is ready to image and transfer to iSCSI target.  Boot into Linux and use command line utilities like fdisk and dd to image the Windows 7 partition.

First, decide the partition size:

# fdisk -lu /dev/sdb

Disk /dev/sdb: 1000.2 GB, 1000204886016 bytes
255 heads, 63 sectors/track, 121601 cylinders, total 1953525168 sectors
Units = sectors of 1 * 512 = 512 bytes
Sector size (logical/physical): 512 bytes / 512 bytes
I/O size (minimum/optimal): 512 bytes / 512 bytes
Disk identifier: 0xdf70df70

   Device Boot      Start         End      Blocks   Id  System
/dev/sdb1   *     2099200   309299199   153600000    7  HPFS/NTFS
/dev/sdb2       718899200  1953521663   617311232    f  W95 Ext'd (LBA)
/dev/sdb5       718901248  1333301247   307200000    7  HPFS/NTFS
/dev/sdb6      1333303296  1435703295    51200000    7  HPFS/NTFS
/dev/sdb7      1435705344  1953521663   258908160    7  HPFS/NTFS

In above example, the windows 7 partition is /dev/sdb1.  The sector start from 209920 and end at 309299199.  However, sector from 1 to 2099199 is necessary too as it contain the MBR code to make Windows 7 boots properly.  The total size to of Windows 7 image should start from sector 1 to 309299199.  Each sector has size 512 bytes.

# dd if=/dev/sdb of=win7.img bs=512 count=309299199

The block size of 512 bytes of above example may be slow to image the partition.  Try switch the bs and count value may accelerate the imaging process:

# dd if=/dev/sdb of=win7.img bs=309299199 count=512

Transfer win7.img to iSCSI target and perform necessary setup.  The Windows 7 instance has successfully migrate to iSCSI target.  The iSCSI target is ready to SAN boot now.

Boot iSCSI target

Once the iSCSI target is setup, use iPXE or gPXE to SAN boot the iSCSI target:

dhcp net0
        sanboot iscsi:nas.example.com::::iqn.example.com:windows-7

Reference

  1. Diskless Windows 7 iSCSI boot from OpenSolaris 2009.06 ZFS Server. URL: http://blog.zorinaq.com/?e=41
  2. Transferring the disk image to a SAN target. URL: http://www.etherboot.org/wiki/sanboot/transfer