Wednesday, December 02, 2009

TxQuery 2.0

TxQuery is created and owned by Alfonso Moreno.  He has stopped the development of TxQuery for years.  However, there are many Delphi developers still using TxQuery.  A barrier for TxQuery migrating to Delphi 2009 and 2010 is the introduction of Unicode.

I contact Alfonso Moreno on Nov 17, 2009 to ask if he may consider make TxQuery open source and let this great product continue enhanced by the Delphi community.  He finally agree and I wish to say big "Thank You" for his contribution.

I have attempted to patch the source code to make it compile and work with Delphi Unicode.  Test cases has been created to make sure it works as expected.  I know there are other cases that I didn't cover yet, just alert me promptly.  You are also welcome to join the maintenance and enhancement for this project.

TxQuery component is a TDataSet descendant component that can be used to query one or more TDataSet descendant components using SQL statements. It is implemented in Delphi 100% source code, no DLL required, because it implements its own SQL syntax parser and SQL engine.

It can be very useful for TDataSet descendants components (including TClientDataSet) that do not use the BDE and that do not implement the SQL language or to mix tables types (dbase, paradox, access).

TxQuery Project Page: https://code.google.com/p/txquery/
TxQuery Group: http://groups.google.com/group/txquery

Saturday, November 07, 2009

Firebird: Deal with Unavailable Database

“unavailble database” error prompt connecting to Firebird service is annoying and difficult to trace.  Sometime it work and sometime it doesn’t.  We don’t know when it work and when it doesn’t work.

“unavailable database” happen in TCP/IP connection

Use TCP/IP connection string to connect to a Firebird database is easy to trace.  The connection string looks like

  • 192.168.5.1:/data/db/test.fdb
  • localhost:/data/db/test.fdb

Please note that localhost is not using local protocol connection but it is a TCP/IP connection using loopback address.

If you encounter “unavailable database” error for TCP/IP connection, please make sure:

  1. You network connection on both end are working and the TCP/IP configuration is correct.  Try to run “PING” to the Firebird server will confirm the connection is working.
  2. Make sure Firebird Service is running
  3. Make sure Firewall doesn’t block Firebird listening port.  Default port number is 3050
  4. Make sure the connection string point to valid Firebird database file

Once you got above verified, the “unavailable database” error prompt should gone.

“unavailable database” happen in Local Protocol

The data transmission throughput for local protocol is few times better than TCP/IP connection.  However, it is easy to encounter “unavailable database” error while using Local Protocol when Firebird is running as service.  The connection string is simple:

  • c:\db\test1.fdb
  • c:\db\test2.fdb

The connection string is the database file path itself without any prefix.

Using Local Protocol with Firebird 1.5

  Run as Application Run as Service
Windows XP Yes Yes. Only work for first logon user
Windows Vista Yes No

Using Local Protocol with Firebird 2.X

  Run as Application Run as Service
Windows XP Yes Yes.  Work for any number of logon users
Windows Vista Yes No

Please note that Local Protocol only works for:

  1. x86 OS and x86 Firebird
  2. x64 OS and x64 Firebird

Local Protocol doesn’t work for x64 OS and x86 Firebird.

The above tables explains why local protocol sometime work and sometime doesn’t work.

Monday, October 19, 2009

DataSnap: In-process IAppServer connection via TDSProviderConnection

Classic DataSnap

Prior to Delphi 2009, we may use either TLocalConnection or TSocketConnection together with TConnectionBroker for in-process or out-of-process communication via IAppServer interface.  There are even more DataSnap connection that supports IAppServer.  Check Delphi helps for details.

New DataSnap from Delphi 2009

Previously, TSQLConnection was used in DataSnap server only.  In new DataSnap, we may use TSQLConnection in DataSnap client.  There is a new driver call DataSnap that allow us to connect to a DataSnap server either via TCP or HTTP protocol using REST data packet for multi-tier application.  Furthermore, we may use connect to TDSSever (TDSServer.Name) via TSQLConnection.DriverName for in-process connection.  This benefits us to write a scalable multi-tier DataSnap application to consume server methods.  See here for more details.

In Delphi 2009/2010, a new DataSnap connection component – TDSProviderConnection was introduced.  As the name implied, it supply providers from DataSnap server.  This connection require a TSQLConnection instance to work with in client tier.  Thus, we may use a single TSQLConnection in client tier either in-process or out-of-process.  And that fulfill the design philosophy of  scalable multi-tier DataSnap application.

There are lots of demo or CodeRage videos available in the web showing how to TDSProviderConnection in DataSnap client tier.  However, most of the examples only showing out-of-process design.  I never find one example illustrate the usage of TDSProviderConnection for in-process design while writing this topic.  Hope there are more from other famous or well know Delphi fans.

At first, I thought it is easy to use TDSProviderConnection for in-process design.  But I face problems while follow the rules.  These problems should be related to bugs and in mature design of DataSnap framework.  I will show at here how to deals with the problems

Design a DataSnap module

First, we design a simple DataSnap module for this example.  This is a TDSServerModule descendant instance with 2 components: a TDataSetProvider and a TClientDataSet instance.  The reason using TDSServerModule is it will manage providers define in the module.

MySeverProvider.DFM

object ServerProvider: TServerProvider
  OldCreateOrder = False
  OnCreate = DSServerModuleCreate
  Height = 225
  Width = 474
  object DataSetProvider1: TDataSetProvider
    DataSet = ClientDataSet1
    Left = 88
    Top = 56
  end
  object ClientDataSet1: TClientDataSet
    Aggregates = <>
    Params = <>
    Left = 200
    Top = 56
  end
end

MyServerProvider.PAS

type
  TServerProvider = class(TDSServerModule)
    DataSetProvider1: TDataSetProvider;
    ClientDataSet1: TClientDataSet;
    procedure DSServerModuleCreate(Sender: TObject);
  end;

{$R *.dfm}

procedure TServerProvider.DSServerModuleCreate(Sender: TObject);
begin
  ClientDataSet1.LoadFromFile('..\orders.cds');
end;

Define a transport layer for the provider module

Since this is a in-process application, we don’t really need a physical transport layer for the provider module.  What we need here is a TDSServer and a TDSServerClass instance that helps propagate the providers to ClientDataSet in later stage.

var C: TDSServer:
    D: TDSServerClass;
begin
  C := TDSServer.Create(nil);
  D := TDSServerClass.Create(nil);
  try
    C.Server := D;
    C.OnGetClass := OnGetClass;
    D.Start;
   
  finally
    D.Free;
    C.Free;
  end;
end;

procedure TForm1.OnGetClass(DSServerClass: TDSServerClass; var
    PersistentClass: TPersistentClass);
begin
  PersistentClass := TServerProvider;
end;

Use TDSProviderConnection to consume the in-process DataSnap service

We start hook up everything in DataSnap context to get it done:

var Q: TSQLConnection;
    D: TDSServer;
    C: TDSServerClass;
    P: TServerProvider;
    N: TDSProviderConnection;
begin
  P := TServerProvider.Create(nil);
  D := TDSServer.Create(nil);
  C := TDSServerClass.Create(nil);
  Q := TSQLConnection.Create(nil);
  N := TDSProviderConnection.Create(nil);
  try
    C.Server := D;
    C.OnGetClass := OnGetClass;

    D.Start;

    Q.DriverName := 'DSServer';
    Q.LoginPrompt := False;
    Q.Open;

    N.SQLConnection := Q;
    N.ServerClassName := 'TServerProvider';
    N.Connected := True;

    ClientDataSet1.RemoteServer := N;
    ClientDataSet1.ProviderName := 'DataSetProvider1';
    ClientDataSet1.Open;

    ShowMessage(IntToStr(ClientDataSet1.RecordCount));
  finally
    N.Free;
    Q.Free;
    C.Free;
    D.Free;
    P.Free;
  end;
end;

If you are using Delphi version 14.0.3513.24210 or prior than that, you will find it doesn’t work, a “Invalid pointer operation” exception raise after that.

I have found all the problems faced so far and the fixed are as follow.

Troubleshoot: Invalid pointer operation

There is a bug in DSUtil.StreamToDataPacket.  I have file a report in QC#78666.

Here is a fix without changing the DBX source code:

unit DSUtil.QC78666;

interface

implementation

uses SysUtils, Variants, VarUtils, ActiveX, Classes, DBXCommonResStrs, DSUtil,
     CodeRedirect;

type
  THeader = class
    const
      Empty       = 1;
      Variant     = 2;
      DataPacket  = 3;
  end;

  PIntArray = ^TIntArray;
  TIntArray = array[0..0] of Integer;

  TVarFlag = (vfByRef, vfVariant);
  TVarFlags = set of TVarFlag;

  EInterpreterError = class(Exception);

  TVariantStreamer = class
  private
    class function ReadArray(VType: Integer; const Data: TStream): OleVariant;
  public
    class function ReadVariant(out Flags: TVarFlags; const Data: TStream): OleVariant;
  end;

const
  EasyArrayTypes = [varSmallInt, varInteger, varSingle, varDouble, varCurrency,
                    varDate, varBoolean, varShortInt, varByte, varWord, varLongWord];

  VariantSize: array[0..varLongWord] of Word  = (0, 0, SizeOf(SmallInt), SizeOf(Integer),
    SizeOf(Single), SizeOf(Double), SizeOf(Currency), SizeOf(TDateTime), 0, 0,
    SizeOf(Integer), SizeOf(WordBool), 0, 0, 0, 0, SizeOf(ShortInt), SizeOf(Byte),
    SizeOf(Word), SizeOf(LongWord));

class function TVariantStreamer.ReadArray(VType: Integer; const Data: TStream): OleVariant;
var
  Flags: TVarFlags;
  LoDim, HiDim, Indices, Bounds: PIntArray;
  DimCount, VSize, i: Integer;
  V: OleVariant;
  LSafeArray: PSafeArray;
  P: Pointer;
begin
  VarClear(Result);
  Data.Read(DimCount, SizeOf(DimCount));
  VSize := DimCount * SizeOf(Integer);
  GetMem(LoDim, VSize);
  try
    GetMem(HiDim, VSize);
    try
      Data.Read(LoDim^, VSize);
      Data.Read(HiDim^, VSize);
      GetMem(Bounds, VSize * 2);
      try
        for i := 0 to DimCount - 1 do
        begin
          Bounds[i * 2] := LoDim[i];
          Bounds[i * 2 + 1] := HiDim[i];
        end;
        Result := VarArrayCreate(Slice(Bounds^,DimCount * 2), VType and varTypeMask);
      finally
        FreeMem(Bounds);
      end;
      if VType and varTypeMask in EasyArrayTypes then
      begin
        Data.Read(VSize, SizeOf(VSize));
        P := VarArrayLock(Result);
        try
          Data.Read(P^, VSize);
        finally
          VarArrayUnlock(Result);
        end;
      end else
      begin
        LSafeArray := PSafeArray(TVarData(Result).VArray);
        GetMem(Indices, VSize);
        try
          FillChar(Indices^, VSize, 0);
          for I := 0 to DimCount - 1 do
            Indices[I] := LoDim[I];
          while True do
          begin
            V := ReadVariant(Flags, Data);
            if VType and varTypeMask = varVariant then
              SafeArrayCheck(SafeArrayPutElement(LSafeArray, Indices^, V))
            else
              SafeArrayCheck(SafeArrayPutElement(LSafeArray, Indices^, TVarData(V).VPointer^));
            Inc(Indices[DimCount - 1]);
            if Indices[DimCount - 1] > HiDim[DimCount - 1] then
              for i := DimCount - 1 downto 0 do
                if Indices[i] > HiDim[i] then
                begin
                  if i = 0 then Exit;
                  Inc(Indices[i - 1]);
                  Indices[i] := LoDim[i];
                end;
          end;
        finally
          FreeMem(Indices);
        end;
      end;
    finally
      FreeMem(HiDim);
    end;
  finally
    FreeMem(LoDim);
  end;
end;

class function TVariantStreamer.ReadVariant(out Flags: TVarFlags; const Data: TStream): OleVariant;
var
  I, VType: Integer;
  W: WideString;
  TmpFlags: TVarFlags;
begin
  VarClear(Result);
  Flags := [];
  Data.Read(VType, SizeOf(VType));
  if VType and varByRef = varByRef then
    Include(Flags, vfByRef);
  if VType = varByRef then
  begin
    Include(Flags, vfVariant);
    Result := ReadVariant(TmpFlags, Data);
    Exit;
  end;
  if vfByRef in Flags then
    VType := VType xor varByRef;
  if (VType and varArray) = varArray then
    Result := ReadArray(VType, Data) else
  case VType and varTypeMask of
    varEmpty: VarClear(Result);
    varNull: Result := NULL;
    varOleStr:
    begin
      Data.Read(I, SizeOf(Integer));
      SetLength(W, I);
      Data.Read(W[1], I * 2);
      Result := W;
    end;
    varDispatch, varUnknown:
      raise EInterpreterError.CreateResFmt(@SBadVariantType,[IntToHex(VType,4)]);
  else
    TVarData(Result).VType := VType;
    Data.Read(TVarData(Result).VPointer, VariantSize[VType and varTypeMask]);
  end;
end;

procedure StreamToDataPacket(const Stream: TStream; out VarBytes: OleVariant);
var
  P: Pointer;
  ByteCount: Integer;
  Size: Int64;
begin
  Stream.Read(Size, 8);
  ByteCount := Integer(Size);
  if ByteCount > 0 then
  begin
    VarBytes := VarArrayCreate([0, ByteCount-1], varByte);
    P := VarArrayLock(VarBytes);
    try
//      Stream.Position := 0;   // QC#78666 "Mismatched in datapacket" with DSUtil.StreamToDataPacket
      Stream.Read(P^, ByteCount);
      Stream.Position := 0;
    finally
      VarArrayUnlock(VarBytes);
    end;
  end
  else
    VarBytes := Null;
end;

procedure StreamToVariantPatch(const Stream: TStream; out VariantValue: OleVariant);
var
  Flags: TVarFlags;
  Header: Byte;
begin
  if Assigned(Stream) then
  begin
    Stream.Position := 0;
    Stream.Read(Header, 1);
    if Header = THeader.Variant then
      VariantValue := TVariantStreamer.ReadVariant(Flags, Stream)
    else if Header = THeader.DataPacket then
      StreamToDataPacket(Stream, VariantValue)
    else
      Assert(false);
  end;
end;

var QC78666: TCodeRedirect;

initialization
  QC78666 := TCodeRedirect.Create(@StreamToVariant, @StreamToVariantPatch);
finalization
  QC78666.Free;
end.

Troubleshoot: I still encounter “Invalid Pointer Operation” after apply DSUtil.StreamToDataPacket patch

I have filed this problem in QC#78752.  An in-process DataSnap create an instance of TDSServerCommand.  A method of TDSServerCommand create TDBXNoOpRow instance:

function TDSServerCommand.CreateParameterRow: TDBXRow;
begin
  Result := TDBXNoOpRow.Create(FDbxContext);
end;

Most of the methods in TDBXNoOpRow is not implemented.  There are 2 methods in class TDBXNoOpRow, GetStream and SetStream are used in subsequence operations.  This is the reason that cause the exception.
After fix TDBXNoOpRow problem, the data packet will transport to ClientDataSet successfully.

The fix is as follow:

unit DBXCommonServer.QC78752;

interface

uses SysUtils, Classes, DBXCommon, DSCommonServer, DBXCommonTable;

type
  TDSServerCommand_Patch = class(TDSServerCommand)
  protected
    function CreateParameterRowPatch: TDBXRow;
  end;

  TDBXNoOpRowPatch = class(TDBXNoOpRow)
  private
    function GetBytesFromStreamReader(const R: TDBXStreamReader; out Buf: TBytes): Integer;
  protected
    procedure GetStream(DbxValue: TDBXStreamValue; var Stream: TStream; var IsNull:
        LongBool); override;
    procedure SetStream(DbxValue: TDBXStreamValue; StreamReader: TDBXStreamReader);
        override;
    function UseExtendedTypes: Boolean; override;
  end;

  TDBXStreamValueAccess = class(TDBXByteArrayValue)
  private
    FStreamStreamReader: TDBXLookAheadStreamReader;
  end;

implementation

uses CodeRedirect;

function TDSServerCommand_Patch.CreateParameterRowPatch: TDBXRow;
begin
  Result := TDBXNoOpRowPatch.Create(FDbxContext);
end;

procedure TDBXNoOpRowPatch.GetStream(DbxValue: TDBXStreamValue; var Stream: TStream;
    var IsNull: LongBool);
var iSize: integer;
    B: TBytes;
begin
  iSize := GetBytesFromStreamReader(TDBXStreamValueAccess(DbxValue).FStreamStreamReader, B);
  IsNull := iSize = 0;
  if not IsNull then begin
    Stream := TMemoryStream.Create;
    Stream.Write(B[0], iSize);
  end;
end;

procedure TDBXNoOpRowPatch.SetStream(DbxValue: TDBXStreamValue; StreamReader:
    TDBXStreamReader);
var B: TBytes;
    iSize: integer;
begin
  iSize := GetBytesFromStreamReader(StreamReader, B);
  Dbxvalue.SetDynamicBytes(0, B, 0, iSize);
end;

function TDBXNoOpRowPatch.GetBytesFromStreamReader(const R: TDBXStreamReader; out Buf: TBytes):
    Integer;
const BufSize = 50 * 1024;
var iPos: integer;
    iRead: integer;
begin
  Result := 0;
  while not R.Eos do begin
    SetLength(Buf, Result + BufSize);
    iPos := Result;
    iRead := R.Read(Buf, iPos, BufSize);
    Inc(Result, iRead);
  end;
  SetLength(Buf, Result);
end;

function TDBXNoOpRowPatch.UseExtendedTypes: Boolean;
begin
  Result := True;
end;

var QC78752: TCodeRedirect;

initialization
  QC78752 := TCodeRedirect.Create(@TDSServerCommand_Patch.CreateParameterRow, @TDSServerCommand_Patch.CreateParameterRowPatch);
finalization
  QC78752.Free;
end.

Troubleshoot: Both patches applied and work for the example but I still encounter “Invalid Pointer Operation”

This problem also filed in QC#78752.  The problem is due to the following 2 methods:

  1. procedure TDBXStreamValue.SetValue
  2. function TDBXLookAheadStreamReader.ConvertToMemoryStream: TStream;

TDBXLookAheadStreamReader.ConvertToMemoryStream return a managed FStream object to TDBXStreamValue.SetValue.  This stream object become another managed object of TDBXStreamValue.  It turns out that a Stream object managed by two objects and the exception raised when these 2 objects attempt to free the Stream object:

procedure TDBXStreamValue.SetValue(const Value: TDBXValue);
begin
  if Value.IsNull then
    SetNull
  else
  begin
    SetStream(Value.GetStream(False), True);
  end;
end;
function TDBXLookAheadStreamReader.ConvertToMemoryStream: TStream;
...
begin
  if FStream = nil then
    Result := nil
  else
  begin
    Count := Size;
    if not (FStream is TMemoryStream) then
    begin
      ...
      StreamTemp := FStream;
      FStream := Stream;
      FreeAndNil(StreamTemp);
    end;
    FStream.Seek(0, soFromBeginning);
    FHasLookAheadByte := false;
    Result := FStream;
  end;
end;

The fix is as follow:

unit DBXCommon.QC78752;

interface

implementation

uses SysUtils, Classes, DBXCommon, CodeRedirect;

type
  TDBXLookAheadStreamReaderAccess = class(TDBXStreamReader)
  private
    FStream: TStream;
    FEOS:               Boolean;
    FHasLookAheadByte:  Boolean;
    FLookAheadByte:     Byte;
  end;

  TDBXLookAheadStreamReaderHelper = class helper for TDBXLookAheadStreamReader
  private
    function Accessor: TDBXLookAheadStreamReaderAccess;
  public
    function ConvertToMemoryStreamPatch: TStream;
  end;

function TDBXLookAheadStreamReaderHelper.Accessor:
    TDBXLookAheadStreamReaderAccess;
begin
  Result := TDBXLookAheadStreamReaderAccess(Self);
end;

function TDBXLookAheadStreamReaderHelper.ConvertToMemoryStreamPatch: TStream;
var
  Stream: TMemoryStream;
  StreamTemp: TStream;
  Count: Integer;
  Buffer: TBytes;
  ReadBytes: Integer;
begin
  if Accessor.FStream = nil then
    Result := nil
  else
  begin
    Count := Size;
    if not (Accessor.FStream is TMemoryStream) then
    begin
      Stream := TMemoryStream.Create;
      if Count >= 0 then
        Stream.SetSize(Count);
      if Accessor.FHasLookAheadByte then
        Stream.Write(Accessor.FLookAheadByte, 1);
      SetLength(Buffer, 256);
      while true do
      begin
        ReadBytes := Accessor.FStream.Read(Buffer, Length(Buffer));
        if ReadBytes > 0 then
          Stream.Write(Buffer, ReadBytes)
        else
          Break;
      end;
      StreamTemp := Accessor.FStream;
      Accessor.FStream := Stream;
      FreeAndNil(StreamTemp);
      Result := Accessor.FStream;
    end else begin
      Stream := TMemoryStream.Create;
      Accessor.FStream.Seek(0, soFromBeginning);
      Stream.CopyFrom(Accessor.FStream, Accessor.FStream.Size);
    end;
    Stream.Seek(0, soFromBeginning);
    Accessor.FHasLookAheadByte := false;

    Result := Stream;
//    Stream := TMemoryStream.Create;
//    Stream.LoadFromStream(FStream);
//    FStream.Seek(0, soFromBeginning);
//    Result := Stream;
  end;
end;

var QC78752: TCodeRedirect;

initialization
  QC78752 := TCodeRedirect.Create(@TDBXLookAheadStreamReader.ConvertToMemoryStream, @TDBXLookAheadStreamReader.ConvertToMemoryStreamPatch);
finalization
  QC78752.Free;
end.

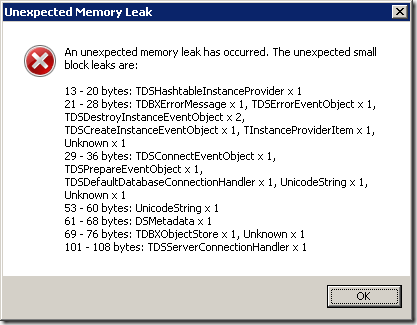
Troubleshoot: I encounter memory leaks after close the application

There is a memory leaks in TDSServerConnection for in-process connection.  I have filed a report in QC#78696.

Here is the fix:

unit DSServer.QC78696;

interface

implementation

uses SysUtils,
     DBXCommon, DSServer, DSCommonServer, DBXMessageHandlerCommon, DBXSqlScanner,
     DBXTransport,
     CodeRedirect;

type
  TDSServerConnectionHandlerAccess = class(TDBXConnectionHandler)
    FConProperties: TDBXProperties;
    FConHandle: Integer;
    FServer: TDSCustomServer;
    FDatabaseConnectionHandler: TObject;
    FHasServerConnection: Boolean;
    FInstanceProvider: TDSHashtableInstanceProvider;
    FCommandHandlers: TDBXCommandHandlerArray;
    FLastCommandHandler: Integer;
    FNextHandler: TDBXConnectionHandler;
    FErrorMessage: TDBXErrorMessage;
    FScanner: TDBXSqlScanner;
    FDbxConnection: TDBXConnection;
    FTransport: TDSServerTransport;
    FChannel: TDbxChannel;
    FCreateInstanceEventObject: TDSCreateInstanceEventObject;
    FDestroyInstanceEventObject: TDSDestroyInstanceEventObject;
    FPrepareEventObject: TDSPrepareEventObject;
    FConnectEventObject: TDSConnectEventObject;
    FErrorEventObject: TDSErrorEventObject;
    FServerCon: TDSServerConnection;
  end;

  TDSServerConnectionPatch = class(TDSServerConnection)
  public
    destructor Destroy; override;
  end;

  TDSServerDriverPatch = class(TDSServerDriver)
  protected
    function CreateConnectionPatch(ConnectionBuilder: TDBXConnectionBuilder): TDBXConnection;
  end;

destructor TDSServerConnectionPatch.Destroy;
begin
  inherited Destroy;
  TDSServerConnectionHandlerAccess(ServerConnectionHandler).FServerCon := nil;
  ServerConnectionHandler.Free;
end;

function TDSServerDriverPatch.CreateConnectionPatch(
  ConnectionBuilder: TDBXConnectionBuilder): TDBXConnection;
begin
  Result := TDSServerConnectionPatch.Create(ConnectionBuilder);
end;

var QC78696: TCodeRedirect;

initialization
  QC78696 := TCodeRedirect.Create(@TDSServerDriverPatch.CreateConnection, @TDSServerDriverPatch.CreateConnectionPatch);
finalization
  QC78696.Free;
end.
Wednesday, October 14, 2009

DataSnap: In-Process Server Method

DataSnap Server Method was introduced in Delphi 2009.  Most video or demo about DataSnap server method available only introduce socket based client server access communication. e.g.: TCP or HTTP protocol.
However, DataSnap was designed as a scalable data access solution that able to work with one, two, three or more tiers model.  All examples we see so far are suitable for 2 or 3 tiers design.  I can’t find any example talking about 1 tier or in-process design.
Indeed, it is very simple to work with in-process server method.  Most steps are similar to out-of-process server methods.

Define a Server Method

Define a well known EchoString() and a Sum() server method:
unit MyServerMethod;
interface
uses Classes, DBXCommon;
type
  {$MethodInfo On}
  TMyServerMethod = class(TPersistent)
  public
    function EchoString(Value: string): string;
    function Sum(const a, b: integer): integer; 
  end;
  {$MethodInfo Off}

implementation
function TMyServerMethod.EchoString(Value: string): string;
begin
  Result := Value;
end;

function TMyServerMethod.Sum(const a, b: integer): integer;
begin
  Result := a + b;
end;

end.

Define a DataModule to access the server method

Drop a TDSServer and TDSServerClass as usual to the data module.  Define a OnGetClass event to TDSServerClass instance.  Please note that you don’t need to drop any transport components like TDSTCPServerTransport or TDSHTTPServer as we only want to consume the server method for in-process only.
object MyServerMethodDataModule1: TMyServerMethodDataModule
  OldCreateOrder = False
  Height = 293
  Width = 419
  object DSServer1: TDSServer
    AutoStart = True
    HideDSAdmin = False
    Left = 64
    Top = 40
  end
  object DSServerClass1: TDSServerClass
    OnGetClass = DSServerClass1GetClass
    Server = DSServer1
    LifeCycle = 'Server'
    Left = 64
    Top = 112
  end
end


unit MyServerMethodDataModule;
uses MyServerMethod;
procedure TMyServerMethodDataModule.DSServerClass1GetClass(DSServerClass: TDSServerClass;
    var PersistentClass: TPersistentClass);
begin
  PersistentClass := TMyServerMethod;
end;

Generate Server Method Client Classes

It is not easy to generate the server method client classes design for in-process server.  You may try any methods you are familiar with to hook up your server method to TCP or HTTP transport service, start the service and attempt to generate the client class by any means.
//
// Created by the DataSnap proxy generator.
//

unit DataSnapProxyClient;
interface
uses DBXCommon, DBXJSON, Classes, SysUtils, DB, SqlExpr, DBXDBReaders;
type
  TMyServerMethodClient = class
  private
    FDBXConnection: TDBXConnection;
    FInstanceOwner: Boolean;
    FEchoStringCommand: TDBXCommand;
  public
    constructor Create(ADBXConnection: TDBXConnection); overload;
    constructor Create(ADBXConnection: TDBXConnection; AInstanceOwner: Boolean); overload;
    destructor Destroy; override;
    function EchoString(Value: string): string;
    function Sum(const a, b: integer): integer;
  end;

implementation
function TMyServerMethodClient.EchoString(Value: string): string;
begin
  if FEchoStringCommand = nil then
  begin
    FEchoStringCommand := FDBXConnection.CreateCommand;
    FEchoStringCommand.CommandType := TDBXCommandTypes.DSServerMethod;
    FEchoStringCommand.Text := 'TMyServerMethod.EchoString';
    FEchoStringCommand.Prepare;
  end;
  FEchoStringCommand.Parameters[0].Value.SetWideString(Value);
  FEchoStringCommand.ExecuteUpdate;
  Result := FEchoStringCommand.Parameters[1].Value.GetWideString;
end;

function TMyServerMethodClient.Sum(a: Integer; b: Integer): Integer;
begin
  if FSumCommand = nil then
  begin
    FSumCommand := FDBXConnection.CreateCommand;
    FSumCommand.CommandType := TDBXCommandTypes.DSServerMethod;
    FSumCommand.Text := 'TMyServerMethod.Sum';
    FSumCommand.Prepare;
  end;
  FSumCommand.Parameters[0].Value.SetInt32(a);
  FSumCommand.Parameters[1].Value.SetInt32(b);
  FSumCommand.ExecuteUpdate;
  Result := FSumCommand.Parameters[2].Value.GetInt32;
end;

constructor TMyServerMethodClient.Create(ADBXConnection: TDBXConnection);
begin
  inherited Create;
  if ADBXConnection = nil then
    raise EInvalidOperation.Create('Connection cannot be nil.  Make sure the connection has been opened.');
  FDBXConnection := ADBXConnection;
  FInstanceOwner := True;
end;

constructor TMyServerMethodClient.Create(ADBXConnection: TDBXConnection; AInstanceOwner: Boolean);
begin
  inherited Create;
  if ADBXConnection = nil then
    raise EInvalidOperation.Create('Connection cannot be nil.  Make sure the connection has been opened.');
  FDBXConnection := ADBXConnection;
  FInstanceOwner := AInstanceOwner;
end;

destructor TMyServerMethodClient.Destroy;
begin
  FreeAndNil(FEchoStringCommand);
  inherited;
end;

end.

Invoke the server method via in-process

You may see from the following code that there is no different to access the server method for in-process and out-of-process design.
First, you create an instant of datasnap server.  This will register the DSServer to the TDBXDriverRegistry.  e.g. DSServer1 in this case.
You may then use TSQLConnection with DSServer1 as driver name instead of “DataSnap” that require socket connection to initiate in-process communication invoking the server method.
var o: TMyServerMethodDataModule;
    Q: TSQLConnection;
    c: TMyServerMethodClient;
begin
  o := TMyServerMethodDataModule.Create(Self);   Q := TSQLConnection.Create(Self);
  try
    Q.DriverName := 'DSServer1';     Q.LoginPrompt := False;
    Q.Open;

    c := TMyServerMethodClient.Create(Q.DBXConnection);
    try
      ShowMessage(c.EchoString('Hello'));
    finally
      c.Free;
    end;

  finally
    o.Free;
    Q.Free;
  end;
end;

Troubleshoot: Encounter Memory Leak after consume the in-process server methods

This happens in Delphi 2010 build 14.0.3513.24210.  It may have fixed in future release.  You may check QC#78696 for latest status.  Please note that you need to add “ReportMemoryLeaksOnShutdown := True;” in the code to show the leak report.
1
The memory leaks has no relation with in-process server methods.  It should be a problem in class TDSServerConnection where a property ServerConnectionHandler doesn’t free after consume.
Here is a fix for the problem:
unit DSServer.QC78696;
interface
implementation
uses SysUtils,
     DBXCommon, DSServer, DSCommonServer, DBXMessageHandlerCommon, DBXSqlScanner,
     DBXTransport,
     CodeRedirect;

type
  TDSServerConnectionHandlerAccess = class(TDBXConnectionHandler)
    FConProperties: TDBXProperties;
    FConHandle: Integer;
    FServer: TDSCustomServer;
    FDatabaseConnectionHandler: TObject;
    FHasServerConnection: Boolean;
    FInstanceProvider: TDSHashtableInstanceProvider;
    FCommandHandlers: TDBXCommandHandlerArray;
    FLastCommandHandler: Integer;
    FNextHandler: TDBXConnectionHandler;
    FErrorMessage: TDBXErrorMessage;
    FScanner: TDBXSqlScanner;
    FDbxConnection: TDBXConnection;
    FTransport: TDSServerTransport;
    FChannel: TDbxChannel;
    FCreateInstanceEventObject: TDSCreateInstanceEventObject;
    FDestroyInstanceEventObject: TDSDestroyInstanceEventObject;
    FPrepareEventObject: TDSPrepareEventObject;
    FConnectEventObject: TDSConnectEventObject;
    FErrorEventObject: TDSErrorEventObject;
    FServerCon: TDSServerConnection;
  end;

  TDSServerConnectionPatch = class(TDSServerConnection)
  public
    destructor Destroy; override;
  end;

  TDSServerDriverPatch = class(TDSServerDriver)
  protected
    function CreateConnectionPatch(ConnectionBuilder: TDBXConnectionBuilder): TDBXConnection;
  end;

destructor TDSServerConnectionPatch.Destroy;
var o: TDSServerConnectionHandlerAccess;
begin
  inherited Destroy;
  o := TDSServerConnectionHandlerAccess(ServerConnectionHandler);
  if o.FServerCon = Self then begin
    o.FServerCon := nil;
    ServerConnectionHandler.Free;
  end;
end;

function TDSServerDriverPatch.CreateConnectionPatch(
  ConnectionBuilder: TDBXConnectionBuilder): TDBXConnection;
begin
  Result := TDSServerConnectionPatch.Create(ConnectionBuilder);
end;

var QC78696: TCodeRedirect;
initialization
  QC78696 := TCodeRedirect.Create(@TDSServerDriverPatch.CreateConnection, @TDSServerDriverPatch.CreateConnectionPatch);
finalization
  QC78696.Free;
end.
Troubleshoot: Encounter "Invalid command handle" when consume more than one server method at runtime for in-process application

This happens in Delphi 2010 build 14.0.3513.24210.  It may have fixed in future release.  You may check QC#78698 for latest status.
To replay this problem, you may consume the server method as:
    c := TMyServerMethodClient.Create(Q.DBXConnection);
    try
      ShowMessage(c.EchoString('Hello'));
      ShowMessage(IntToStr(c.Sum(100, 200)));
    finally
      c.Free;
    end;

or this:
    c := TMyServerMethodClient.Create(Q.DBXConnection);
    try
      ShowMessage(c.EchoString('Hello'));
      ShowMessage(IntToStr(c.Sum(100, 200)));
      ShowMessage(c.EchoString('Hello'));
    finally
      c.Free;
    end;

Here is a fix for the problem
unit DSServer.QC78698;
interface
implementation
uses SysUtils, Classes,
     DBXCommon, DBXMessageHandlerCommon, DSCommonServer, DSServer,
     CodeRedirect;

type
  TDSServerCommandAccess = class(TDBXCommand)
  private
    FConHandler: TDSServerConnectionHandler;
    FServerCon: TDSServerConnection;
    FRowsAffected: Int64;
    FServerParameterList: TDBXParameterList;
  end;

  TDSServerCommandPatch = class(TDSServerCommand)
  private
    FCommandHandle: integer;
    function Accessor: TDSServerCommandAccess;
  private
    procedure ExecutePatch;
  protected
    procedure DerivedClose; override;
    function DerivedExecuteQuery: TDBXReader; override;
    procedure DerivedExecuteUpdate; override;
    function DerivedGetNextReader: TDBXReader; override;
    procedure DerivedPrepare; override;
  end;

  TDSServerConnectionPatch = class(TDSServerConnection)
  public
    function CreateCommand: TDBXCommand; override;
  end;

  TDSServerDriverPatch = class(TDSServerDriver)
  private
    function CreateServerCommandPatch(DbxContext: TDBXContext; Connection:
        TDBXConnection; MorphicCommand: TDBXCommand): TDBXCommand;
  public
    constructor Create(DBXDriverDef: TDBXDriverDef); override;
  end;

constructor TDSServerDriverPatch.Create(DBXDriverDef: TDBXDriverDef);
begin
  FCommandFactories := TStringList.Create;
  rpr;
  InitDriverProperties(TDBXProperties.Create);
  // '' makes this the default command factory.
  //
  AddCommandFactory('', CreateServerCommandPatch);
end;

function TDSServerDriverPatch.CreateServerCommandPatch(DbxContext: TDBXContext;
    Connection: TDBXConnection; MorphicCommand: TDBXCommand): TDBXCommand;
var
  ServerConnection: TDSServerConnection;
begin
  ServerConnection := Connection as TDSServerConnection;
  Result := TDSServerCommandPatch.Create(DbxContext, ServerConnection, TDSServerHelp.GetServerConnectionHandler(ServerConnection));
end;

function TDSServerCommandPatch.Accessor: TDSServerCommandAccess;
begin
  Result := TDSServerCommandAccess(Self);
end;

procedure TDSServerCommandPatch.DerivedClose;
var
  Message: TDBXCommandCloseMessage;
begin
  Message := Accessor.FServerCon.CommandCloseMessage;
  Message.CommandHandle := FCommandHandle;
  Message.HandleMessage(Accessor.FConHandler);
end;

function TDSServerCommandPatch.DerivedExecuteQuery: TDBXReader;
var
  List: TDBXParameterList;
  Parameter: TDBXParameter;
  Reader: TDBXReader;
begin
  ExecutePatch;
  List := Parameters;
  if (List <> nil) and (List.Count > 0) then
  begin
    Parameter := List.Parameter[List.Count - 1];
    if Parameter.DataType = TDBXDataTypes.TableType then
    begin
      Reader := Parameter.Value.GetDBXReader;
      Parameter.Value.SetNull;
      Exit(Reader);
    end;
  end;
  Result := nil;
end;

procedure TDSServerCommandPatch.DerivedExecuteUpdate;
begin
  ExecutePatch;
end;

function TDSServerCommandPatch.DerivedGetNextReader: TDBXReader;
var
  Message: TDBXNextResultMessage;
begin
  Message := Accessor.FServerCon.NextResultMessage;
  Message.CommandHandle := FCommandHandle;
  Message.HandleMessage(Accessor.FConHandler);
  Result := Message.NextResult;
end;

procedure TDSServerCommandPatch.DerivedPrepare;
begin
  inherited;
  FCommandHandle := Accessor.FServerCon.PrepareMessage.CommandHandle;
end;

procedure TDSServerCommandPatch.ExecutePatch;
var
  Count: Integer;
  Ordinal: Integer;
  Params: TDBXParameterList;
  CommandParams: TDBXParameterList;
  Message: TDBXExecuteMessage;
begin
  Message := Accessor.FServerCon.ExecuteMessage;
  if not IsPrepared then
    Prepare;
  for ordinal := 0 to Parameters.Count - 1 do
    Accessor.FServerParameterList.Parameter[Ordinal].Value.SetValue(Parameters.Parameter[Ordinal].Value);
  Message.Command := Text;
  Message.CommandType := CommandType;
  Message.CommandHandle := FCommandHandle;
  Message.Parameters := Parameters;
  Message.HandleMessage(Accessor.FConHandler);
  Params := Message.Parameters;
  CommandParams := Parameters;
  if Params <> nil then
  begin
    Count := Params.Count;
    if Count > 0 then
      for ordinal := 0 to Count - 1 do
      begin
        CommandParams.Parameter[Ordinal].Value.SetValue(Params.Parameter[Ordinal].Value);
        Params.Parameter[Ordinal].Value.SetNull;
      end;
  end;
  Accessor.FRowsAffected := Message.RowsAffected;
end;

function TDSServerConnectionPatch.CreateCommand: TDBXCommand;
var
  Command: TDSServerCommand;
begin
  Command := TDSServerCommandPatch.Create(FDbxContext, self, ServerConnectionHandler);
  Result := Command;
end;

var QC78698: TCodeRedirect;
initialization
  QC78698 := TCodeRedirect.Create(@TDSServerConnection.CreateCommand, @TDSServerConnectionPatch.CreateCommand);
finalization
  QC78698.Free;
end.

Reference:
  1. QC#78696: Memory Leak in TDSServerConnection for in-process connection
  2. QC#78698: Encounter "Invalid command handle" when consume more than one server method at runtime for in-process application

Wednesday, October 07, 2009

Linux: Configure a local repository from ISO image for YUM

yum is an interactive, rpm based, package manager. It can automatically perform system updates, including dependancy analysis and obsolete processing based on "repository" metadata. It can also perform installation of new packages, removal of old packages and perform queries on the installed and/or available packages among many other commands/services (see below). yum is similar to other high level package managers like apt-get and smart.

After install Fedora Core, some default YUM repository is stored in /etc/yum.repos.d.  These repositories are URLs located some where in the Internet. You need an internet connection in order to enjoy the convenient of yum to update your system.  It is rather inconvenient if you have a slow internet connection or you have many machines to update via yum.

A good approach to overcome these problems is setup a local repositories without to avoid grabbing RPM packages via Internet.

Setup a local repository for YUM

First, we need to disable default YUM repository configuration installed by Fedora:

[root@localhost yum.repos.d]# cd /etc/yum.repos.d/
[root@localhost yum.repos.d]# ls -al
total 28
drwxr-xr-x.  2 root root 4096 2009-10-07 09:16 .
drwxr-xr-x. 56 root root 4096 2009-10-07 09:17 ..
-rw-r--r--.  1 root root 1785 2009-05-12 06:45 fedora-rawhide.repo
-rw-r--r--.  1 root root 1144 2009-05-12 06:45 fedora.repo
-rw-r--r--.  1 root root 1105 2009-05-12 06:45 fedora-updates.repo
-rw-r--r--.  1 root root 1163 2009-05-12 06:45 fedora-updates-testing.repo

To disable these repositories, rename all files to *.repo.old:

[root@localhost yum.repos.d]# cd /etc/yum.repos.d/
[root@localhost yum.repos.d]# ls -al
total 28
drwxr-xr-x.  2 root root 4096 2009-10-07 09:16 .
drwxr-xr-x. 56 root root 4096 2009-10-07 09:17 ..
-rw-r--r--.  1 root root 1785 2009-05-12 06:45 fedora-rawhide.repo.old
-rw-r--r--.  1 root root 1144 2009-05-12 06:45 fedora.repo.old
-rw-r--r--.  1 root root 1105 2009-05-12 06:45 fedora-updates.repo.old
-rw-r--r--.  1 root root 1163 2009-05-12 06:45 fedora-updates-testing.repo.old

Create local repository

In this example, the local repository is an Fedora Core ISO image mount under /mnt/cdrom.

Create a local repository configuration file it and store in /etc/yum.repos.d:

[root@localhost yum.repos.d]# cat local.repo
[local]
name=ISO
baseurl=file:///mnt/cdrom

You may now start using YUM to install packages as lightning speed:

[root@localhost etc]# yum install samba

Troubleshoot: Public key for lzma-libs-4.32.7-2.fc11.i586.rpm is not installed

If you encounter an error message like “Public key for ***.rpm is not installed” when running “yum install”, you need to import the RPM public key for the local repository into RPM database first.

The RPM public key is usually reside in the root of ISO image:

[root@localhost cdrom]# ls /mnt/cdrom -al
total 453
drwxr-sr-x. 7 root  499   4096 2009-06-03 06:05 .
drwxr-xr-x. 3 root root   4096 2009-10-07 09:11 ..
-rw-r--r--. 1 root  499     37 2009-06-03 06:04 .discinfo
drwxr-xr-x. 3 root root   2048 2009-06-03 06:02 EFI
-rw-r--r--. 2 root root  18363 2007-07-04 06:06 GPL
drwxr-sr-x. 3 root  499   2048 2009-06-03 06:04 images
drwxr-sr-x. 2 root  499   2048 2009-06-03 06:02 isolinux
-rw-r--r--. 1 root  499     95 2009-06-03 06:05 media.repo
drwxr-sr-x. 2 root  499 405504 2009-06-03 05:48 Packages
-rw-r--r--. 2 root root  10581 2009-05-14 12:59 README-BURNING-ISOS-en_US.txt
drwxr-sr-x. 2 root  499   4096 2009-06-03 06:05 repodata
lrwxrwxrwx. 2 root root     29 2009-06-03 05:51 RPM-GPG-KEY-fedora -> RPM-GPG-KEY-fedora-11-primary
-rw-r--r--. 2 root root   1653 2009-05-12 06:45 RPM-GPG-KEY-fedora-11-primary
lrwxrwxrwx. 2 root root     29 2009-06-03 05:51 RPM-GPG-KEY-fedora-i386 -> RPM-GPG-KEY-fedora-11-primary
-rw-r--r--. 2 root root   1694 2009-05-12 06:45 RPM-GPG-KEY-fedora-ia64
lrwxrwxrwx. 2 root root     29 2009-06-03 05:51 RPM-GPG-KEY-fedora-ppc -> RPM-GPG-KEY-fedora-11-primary
lrwxrwxrwx. 2 root root     29 2009-06-03 05:51 RPM-GPG-KEY-fedora-ppc64 -> RPM-GPG-KEY-fedora-11-primary
lrwxrwxrwx. 2 root root     29 2009-06-03 05:51 RPM-GPG-KEY-fedora-x86_64 -> RPM-GPG-KEY-fedora-11-primary
-r--r--r--. 1 root root   4011 2009-06-03 06:05 TRANS.TBL
-rw-r--r--. 1 root  499   1437 2009-06-03 06:04 .treeinfo

To install the public key, try this:

[root@localhost cdrom]# rpm --import RPM-GPG-KEY-fedora

You may proceed to "yum install” as usual now.

Tuesday, October 06, 2009

Setup a VMWare machine to simulate low speed TCP/IP network

When we design a multi-tiers application in high speed network environment, we do not know if the data communicate performance is up to expectation if running on real network. The cost of develop the application in real network is high. There is a cost effective solution to simulate various kind of bandwidth and traffic conditions for WAN network.

Previously, I learned from DUMMYNET and NistNet has the solution. But it is very hard to deploy the solution for development. I finally found the TC (Traffic control) in iproute package of Linux distribution able to do the task. It is very easy to use.

Combine the TC and routing strategy in Linux network, we may design a masqueraded router that able to let us simulate low speed TCP/IP network in development stage.

We do not need a real machine to configure the router. Use VMWARE workstation to setup a virtual machine running a masqueraded router.

Some Theory

To realize the simulation:

  1. Configure 2 networks and make sure both networks may reach each others. 
  2. Bind a server application to one of the network
  3. Bind a client application to another network
  4. Make sure client may reach server and server response to client promptly
  5. We may then enforce a traffic control rule on one of the network
  6. Establish a connection from client to server and observe how the traffic control rule affect the connection quality.
  7. Tune the traffic control rule and continue monitor the connection quality.

Install and Configure VMWare Workstation

  1. Install and Start VMWare workstation.  The following illustration use VMware Workstation 6.5.3 as example.
  2. In VMWare Workstation window, click Edit | Virtual Network Editor…
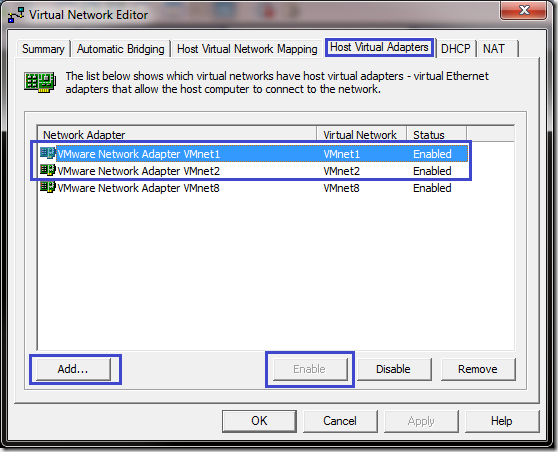
  3. A “Virtual Network Editor” dialog prompt out, switch to page “Host Virtual Adapters”:

    2 
  4. There may be some VMWare network adapter created by default.  In this topic, I need 2 VMware network adapter connect as “Host only”.  For illustration purpose, I add 2 VMware network adapter connected to VMnet1 and VMnet2.
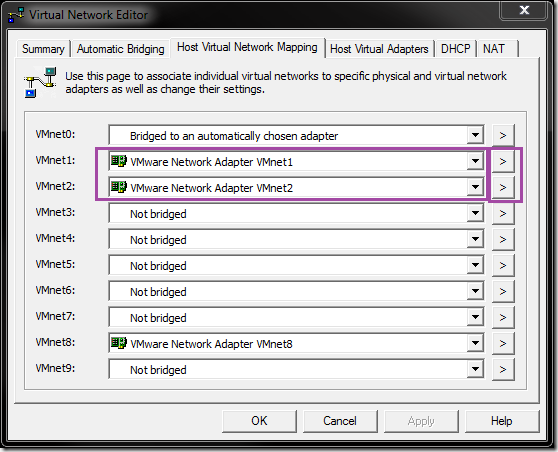
  5. Switch to page “Host Virtual Network Mapping” and make sure both VMnet1 and VMnet2 adapters are attached properly:

    3
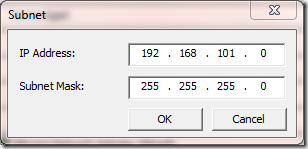
  6. Click the row of VMNet1 “>” button to configure subnet of VMNet1.  Set subnet IP address to “192.168.101.0”:

    5
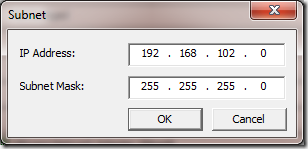
  7. Click the row of VMNet2 “>” button to configure subnet of VMNet2.  Set subnet IP address to “192.168.102.0”:

    6
  8. Click “Apply” button to commit changes.
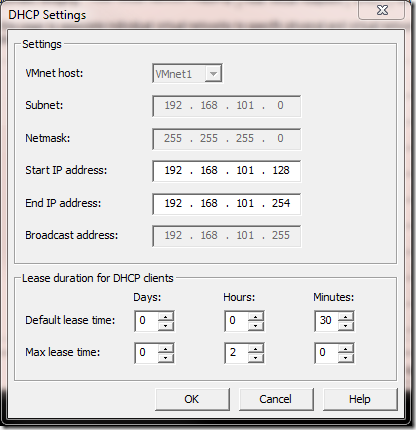
  9. You may also need to check both VMNet1 and VMNet2 DHCP setting to see if the setting is correct:

    7 
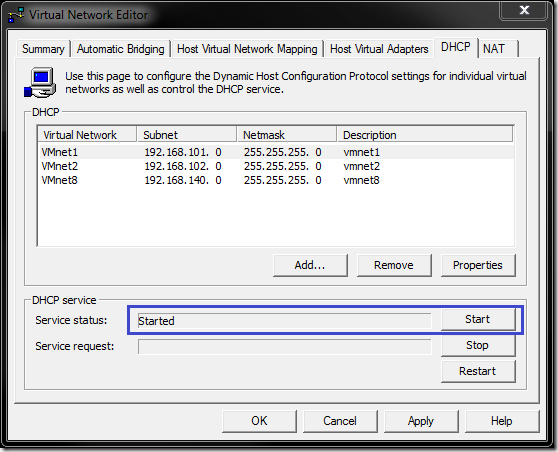
  10. Switch to page “DHCP” and make sure both DHCP service for VMNet1 and VMNet2 are started:
     8
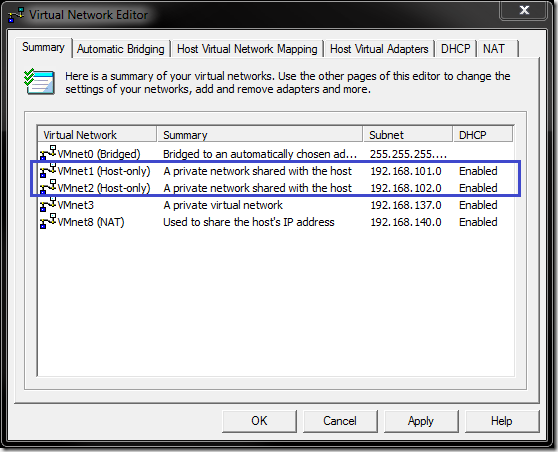
  11. Switch to “Summary” page to check the status of both VMNet1 and VMNet2:

    9 
  12. You may continue to next steps once done

Install a Fedora Core Virtual Machine


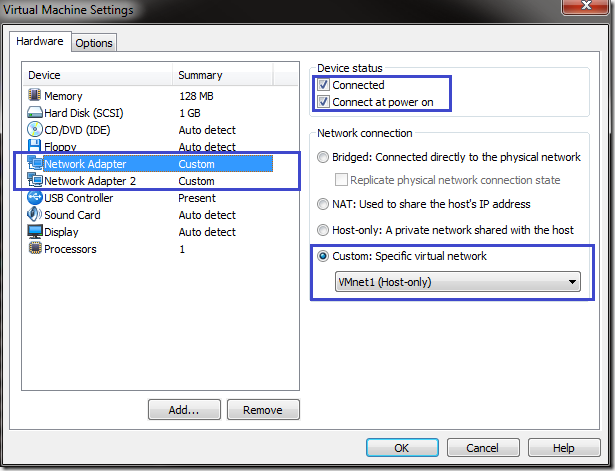
  1. Create a new virtual machine with the following hardware configuration:
    1. Memory: 1GB for installation.  You may change to 128MB after finish installation.
    2. Hard Disk: 1GB
    3. Network adapter 1 connect as “Custom” VMNet1 (Host-Only)
    4. Network adapter 2 connect as “Custom” VMNet2 (Host-Only)

      1
  2. Start the machine and install Fedora Core via any installation methods you prefer. (The following example use Fedora Core 11)
  3. The machine is only use for masqueraded network simulation, you may uncheck all software package to install a minimal bare-bone Fedora Core.

Configure Fedora Core Virtual Machine

  1. Configure network adapter to start after machine boot. 

    $ system-config-network
  2. In “Select Action” screen, select “Edit a device params” and press Enter to enter “Select A Device” screen.
  3. Select “eth0” and press Enter to enter “Network Configuration” screen. Press OK to commit changes.
  4. Select “eth1” and press Enter to enter “Network Configuration” screen. Press OK to commit changes and return to “Select A Device” screen.
  5. Press “Save” button to commit changes and return to “Select Action” screen.
  6. Press “Save&Quit” button to commit changes.
  7. Use “vi” editor to set both devices “ONBOOT” to “Yes”:
  8. $ cat /etc/sysconfig/networking/profiles/default/ifcfg-eth0
    DEVICE=eth0
    HWADDR=00:0c:29:2d:96:b6
    ONBOOT=yes
    BOOTPROTO=dhcp
    TYPE=Ethernet
    USERCTL=no
    PEERDNS=yes
    IPV6INIT=no


    $ cat /etc/sysconfig/networking/profiles/default/ifcfg-eth1
    DEVICE=eth1
    HWADDR=00:0c:29:2d:96:c0
    ONBOOT=yes
    BOOTPROTO=dhcp
    TYPE=Ethernet
    USERCTL=no
    PEERDNS=yes
    IPV6INIT=no

  9. Configure Network Service to make it get started after machine boot

    $ chkconfig –-list network
    network         0:off   1:off   2:off   3:off   4:off   5:off   6:off


    $ chkconfig network on

    $ chkconfig –-list network
    network         0:off   1:off   2:on    3:on    4:on    5:on    6:off

  10. Restart network service

  11. $ service network restart

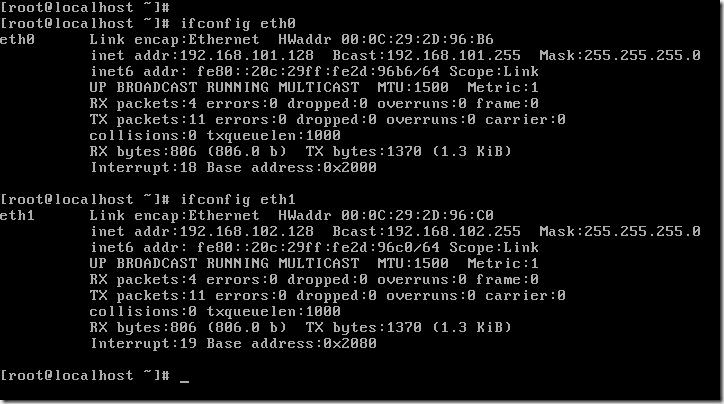
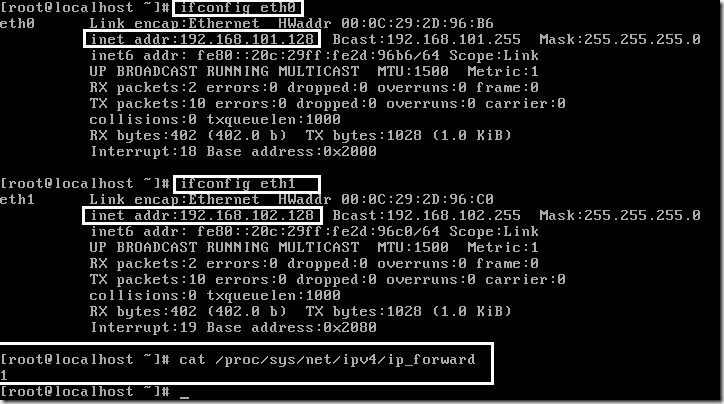
  12. You may then use ifconfig to check both eth0 and eth1 device is up

    10 
  13. Change “net.ipv4.ip_forward” to 1 in file “/etc/sysctl.conf” to enable port forwarding:
  14. $ cat /etc/sysctl.conf
    # Kernel sysctl configuration file for Red Hat Linux
    #
    # For binary values, 0 is disabled, 1 is enabled.  See sysctl(8) and
    # sysctl.conf(5) for more details.

    # Controls IP packet forwarding
    net.ipv4.ip_forward = 1

    # Controls source route verification
    net.ipv4.conf.default.rp_filter = 1

  15. Run the following command to disable Firewall to reduce unnecessary troubles in later stage:

    $ chkconfig iptables off
  16. Restart the machine and double to make sure the following are working
    1. Both etc0 and et1 is up with assigned IP Address
    2. port forwarding is working

10

Troubleshoot: I encounter “Device eth0 does not seem to be present, delaying initialization.” after I clone the virtual machine

From time to time, you may encounter a situation where both the eth0 or eth1 doesn’t up.  Run the following command explicitly may yields:

11

The cause of this problem could be the device has been changed or swap.  The new device names for the network adapter could be eth2 or eth3.  A quick solution to this problem is:

$ rm /etc/udev/rules.d/70-persistent-net.rules
$ reboot

After restart the machine, the device names would restored back to eth0 and eth1.

Troubleshoot: I encounter “Device eth0 has different MAC address than expected, ignoring.” after I clone the virtual machine

This is most probably the HWAddr (Mac Address) of both network adapter (/etc/sysconfig/network-scripts/ifcfg-ethN) doesn’t match with VMWare  virtual machine configuration file (.vmx)

To solve the problem, remove a line “HWADDR” in

  1. /etc/sysconfig/network-scripts/ifcfg-eth0
  2. /etc/sysconfig/network-scripts/ifcfg-eth1

For example,

$ cat /etc/sysconfig/network-scripts/ifcfg-eth0
DEVICE=eth0
HWADDR=00:0c:29:2d:96:b6
ONBOOT=yes
BOOTPROTO=dhcp
TYPE=Ethernet
USERCTL=no
PEERDNS=yes
IPV6INIT=no

Restart network service start network devices:

$ service network restart

Quick Test Connection

You may now use ping command to test if both the VMNet 1 and VMNet 2 network are working in your own host PC (not Fedora in VMWare):

C:\>ping 192.168.101.128

Pinging 192.168.101.128 with 32 bytes of data:
Reply from 192.168.101.128: bytes=32 time<1ms TTL=64

Ping statistics for 192.168.101.128:
    Packets: Sent = 4, Received = 4, Lost = 0 (0% loss),
Approximate round trip times in milli-seconds:
    Minimum = 0ms, Maximum = 0ms, Average = 0ms

C:\>ping 192.168.102.128

Pinging 192.168.102.128 with 32 bytes of data:
Reply from 192.168.102.128: bytes=32 time<1ms TTL=64

Ping statistics for 192.168.102.128:
    Packets: Sent = 4, Received = 4, Lost = 0 (0% loss),
Approximate round trip times in milli-seconds:
    Minimum = 0ms, Maximum = 0ms, Average = 0ms

This test only ensure you may reach both networks from your host but it doesn’t confirm if you may reach VMNet1 from VMNet2 and vice versa.

Advance Test Connection

In your host PC, there should be 2 virtual network adapters (VMNet1 and VMNet2) configured:

C:\>ipconfig

Windows IP Configuration

Ethernet adapter VMware Network Adapter VMnet1:

   Connection-specific DNS Suffix  . :
   Link-local IPv6 Address . . . . . : fe80::f935:c046:af36:32c4%17
   IPv4 Address. . . . . . . . . . . : 192.168.101.1
   Subnet Mask . . . . . . . . . . . : 255.255.255.0
   Default Gateway . . . . . . . . . : 

Ethernet adapter VMware Network Adapter VMnet2:

   Connection-specific DNS Suffix  . :
   Link-local IPv6 Address . . . . . : fe80::d5a7:81c4:e2c9:de44%19
   IPv4 Address. . . . . . . . . . . : 192.168.102.1
   Subnet Mask . . . . . . . . . . . : 255.255.255.0
   Default Gateway . . . . . . . . . :

To make sure both network may reach each other, set the default gateway for both VMNet1 and VMNet2 connection to the Fedora VMware machine’s network adapter.  Please note that the Fedora machine’s network adapters obtained IP addresses via DHCP dynamically.  You may use ifconfig to check the IP addresses:

$ ifconfig eth0

$ ifconfig eth1

Once you get the IP addresses, set it to VMNet1 and VMNet2 adapter of your host PC respectively:

C:\>ipconfig

Windows IP Configuration

Ethernet adapter VMware Network Adapter VMnet1:

   Connection-specific DNS Suffix  . :
   Link-local IPv6 Address . . . . . : fe80::f935:c046:af36:32c4%17
   IPv4 Address. . . . . . . . . . . : 192.168.101.1
   Subnet Mask . . . . . . . . . . . : 255.255.255.0
   Default Gateway . . . . . . . . . : 192.168.101.128

Ethernet adapter VMware Network Adapter VMnet2:

   Connection-specific DNS Suffix  . :
   Link-local IPv6 Address . . . . . : fe80::d5a7:81c4:e2c9:de44%19
   IPv4 Address. . . . . . . . . . . : 192.168.102.1
   Subnet Mask . . . . . . . . . . . : 255.255.255.0
   Default Gateway . . . . . . . . . : 192.168.102.128

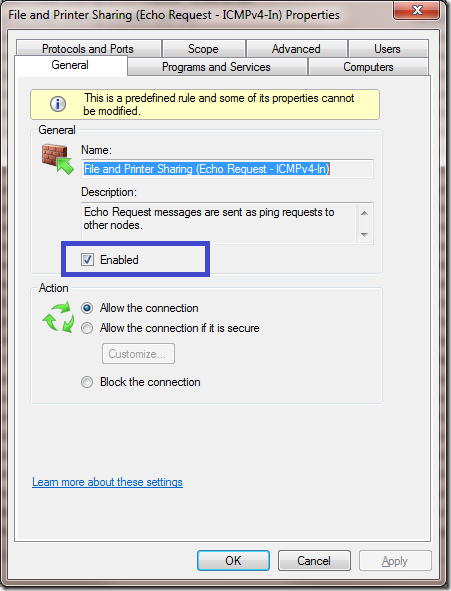
You may need to check if your Firewall allow ICMP Echo Request connection.  In Windows Vista or Windows 7, Start “Windows Firewall and with Advanced Security” in privilege account and enable a rule “File and Printer Sharing (Echo Request – ICMPv4-In)

12

You may use the following ping command to test if both networks may reach others:

C:\>ping -S 192.168.102.1 192.168.101.1

Pinging 192.168.101.1 from 192.168.102.1 with 32 bytes of data:
Reply from 192.168.101.1: bytes=32 time<1ms TTL=127

Ping statistics for 192.168.101.1:
    Packets: Sent = 4, Received = 4, Lost = 0 (0% loss),
Approximate round trip times in milli-seconds:
    Minimum = 0ms, Maximum = 0ms, Average = 0ms

C:\>ping -S 192.168.101.1 192.168.102.1

Pinging 192.168.102.1 from 192.168.101.1 with 32 bytes of data:
Reply from 192.168.102.1: bytes=32 time<1ms TTL=127

Ping statistics for 192.168.102.1:
    Packets: Sent = 4, Received = 4, Lost = 0 (0% loss),
Approximate round trip times in milli-seconds:
    Minimum = 0ms, Maximum = 0ms, Average = 0ms

Now it shows that both 192.168.101.0 and 192.168.102.0 networks may reach others.  We may proceed to traffic control.

Setup TC to simulate broadband connection

Example 1: Delay

# add the delay to device
$ tc qdisc add dev eth0 root netem delay 25ms 10ms

# change the delay of device
$ tc qdisc change dev eth0 root netem delay 35ms 10ms

# show the information of device
$ tc qdisc show dev eth0

# delete the device traffic control
$ tc qdisc delete dev eth0 root

Example 2: Rate 

# add rate control to eth1 
$ tc qdisc add dev eth1 root tbf rate 384kbit buffer 1600 limit 3000

# change the delay of device
$ tc qdisc change dev eth1 root tbf rate 5kbit buffer 1600 limit 3000

# show the information of device
$ tc qdisc show dev eth1

# delete the device traffic control
$ tc qdisc delete dev eth1 root

Reference:

  1. http://www.linuxfoundation.org/en/Net:Netem

Friday, October 02, 2009

Configure Windows 7 IIS7 for ISAPI DLL

Windows 7 IIS7 require some configurations to get ISAPI DLL works.  It is not that straight forward compare to IIS 5.

Install IIS 7

  1. Go to Control Panel | Programs and Features | Turn on Windows features on or off (require privilege mode).
  2. Check “Internet Information Services and make sure “ISAPI Extensions” and “ISAPI Filters” is checked as well.
  3. Click OK button to start installation.

1

After finish install IIS 7, open your favorite web browser and enter URL http://localhost/ to make sure the IIS is working and running.  You might need to check your firewall setting and add exception for port 80 TCP traffic if necessary.

Configure for ISAPI DLL

Add Virtual Directory

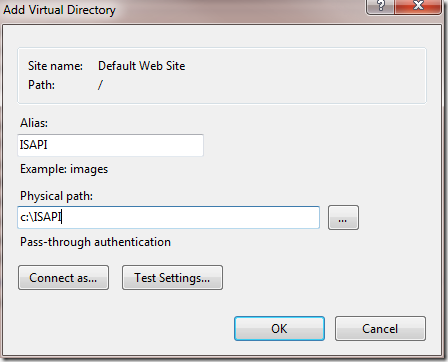
First, you may need to add a virtual directory to host your ISAPI DLL:

  1. Open Internet Information Service Manager (require privilege mode)
  2. Right click on “Default Web Site” node and click “Add Virtual Directory” of popup menu:

2

Enter “Alias” and “Physical Path” of the virtual directory:

3

Enable ISAPI for Virtual Directory

To enable ISAPI for the virtual directory:

  1. Select the virtual directory node (e.g.: “ISAPI” in this example). 
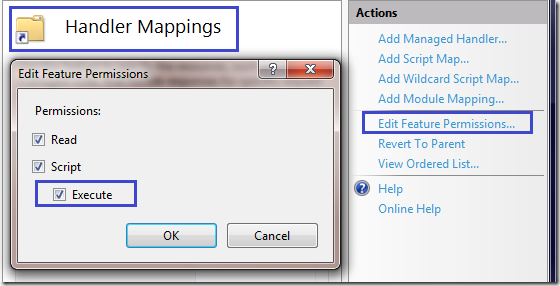
  2. Double click the “Handler Mappings” icon. 
  3. Click “Edit Feature Permissions…” in Actions panel
  4. A “Edit Feature Permission” dialog prompt out
  5. Check “Execute”.
  6. Click OK button to commit the changes.

4

Enable Directory Browsing for Virtual Directory

This is optional but is convenient.  To enable Directory Browsing for a virtual directory:

  1. Select the virtual directory node (e.g.: “ISAPI” in this example). 
  2. Double click the “Directory Browsing” icon.
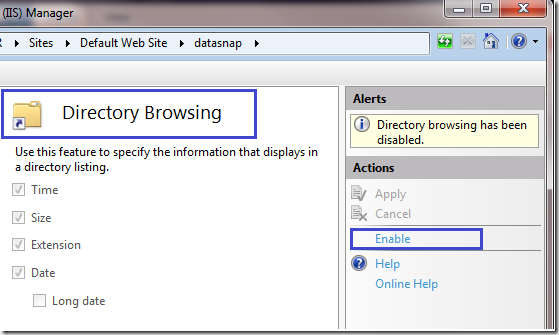
  3. Click “Enable” in Actions panel.

5

Edit Anonymous Authentication Credentials

  1. Select the virtual directory node.
  2. Double click the “Authentication” icon.
  3. Click to select “Anonymous Authentication” item.
  4. Click “Edit…” in Actions panel.
  5. A dialog will prompt out.
  6. Checked “Application pool identity” and press OK button to commit changes.

1

Enable ISAPI modules

  1. Click on the root node.
  2. Double click the “ISAPI and CGI Restrictions” icon.
  3. Click ”Edit Feature Setting …” in Actions panel.
  4. Check “Allow unspecified ISAPI modules” option.  This option allow any ISAPI dll to be executed under IIS.  If you don’t use this option, you will need to specify a list of ISAPI DLLs explicitly.

6

Edit Permission for Virtual Directory

  1. Select the virtual directory node (e.g.: “ISAPI” in this example). 
  2. Right click on the node and click “Edit Permission” of popup menu.
  3. A Properties dialog prompt out.
  4. Switch to “Security” page
  5. Click Edit button to show Permission dialog.
  6. Add “IIS_IUSRS” into the permission list.

7

Enable 32 bits ISAPI DLL on IIS 7 x64

This is only require if you are using IIS7 x64 and would like to run 32 bits ISAPI DLL on the IIS.  If your ISAPI DLL and IIS7 is both x86 or both x64, you may skip this step.

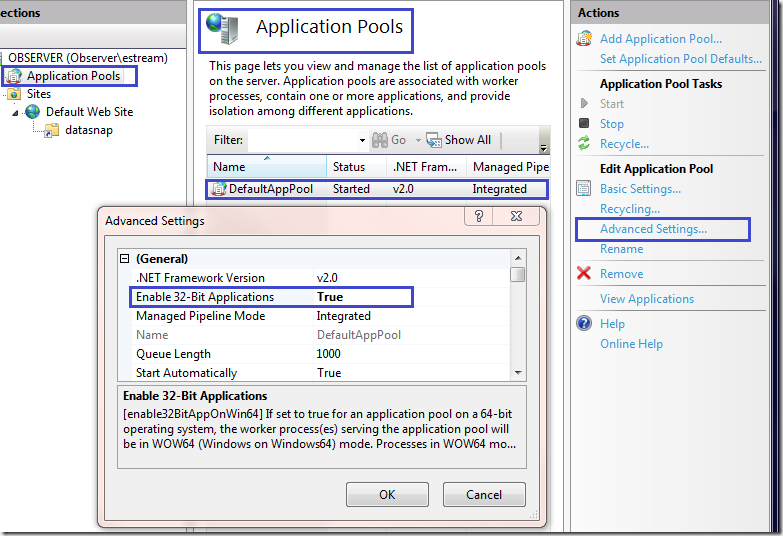
  1. Click “Application Pools” node.
  2. Click “DefaultAppPool” item
  3. Click “Advanced Settings …” from Actions panel.
  4. A “Advanced Settings” dialog prompt out
  5. Set “Enable 32-bits Applications” to True
  6. Click OK button to commit changes

8

If you didn’t enable this options for 32 bits applications, you may encounter the following errors when execute the ISAPI from web browser:

HTTP Error 500.0 - Internal Server Error

The page cannot be displayed because an internal server error has occurred.

HTTP Error 500.0 - Internal Server Error
Module    IsapiModule
Notification    ExecuteRequestHandler
Handler    ISAPI-dll
Error Code    0x800700c1
Requested URL   
http://localhost:80/isapi/isapi.dll
Physical Path    C:\isapi\isapi.dll
Logon Method    Anonymous
Logon User    Anonymous
 

You may now deploy your ISAPI DLLs into the virtual directory and start execute the library from web browser.

DataSnap and ISAPI DLL

You may create Delphi DataSnap ISAPP DLL library and deploy on IIS.  From time to time, you may encounter compilation error during development or deployment time if you have consume the ISAPI DLL.  This is because the ISAPI DLL invoked will cache in the application pool.  You are not allow to overwrite the ISAPI DLL while it’s being cached.

To overcome this problem, you need to perform Recycle operation:

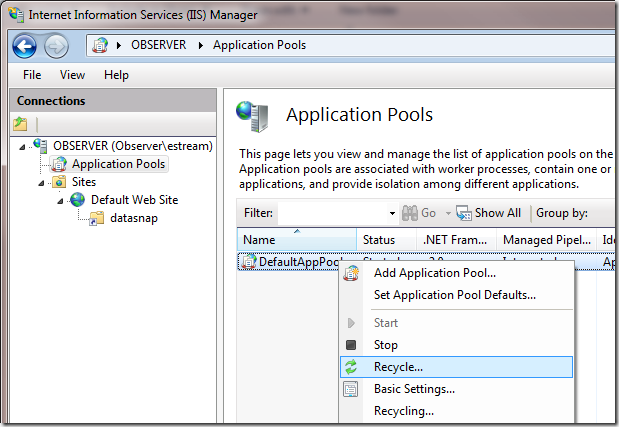
  1. Click “Application Pools” node.
  2. Right click on “DefaultAppPool” item and click “Recycle…” item.

Capture

Deploying as ISAPI DLL is encourage during deployment stage as IIS will cache the ISAPI DLL for performance consideration.

However, the caching might not feasible during development stage as recycling need to be performed while overwrite the ISAPI DLL either by frequent compiling or overwriting.  You may consider compile the server modules as CGI application in development time.  Each invocation of CGI is a separate OS process and won’t be cache by IIS application pool.

Install CGI on IIS

  1. Go to Control Panel | Programs and Features | Turn on Windows features on or off (require privilege mode).
  2. Check “Internet Information Services and make sure “CGI” is checked.
  3. Click OK button to start installation.

2

Enable CGI Module

  1. Click on the root node.
  2. Double click the “ISAPI and CGI Restrictions” icon.
  3. Click ”Edit Feature Setting …” in Actions panel.
  4. Check “Allow unspecified CGI modules” option.

3

Consume DataSnap Server Methods via URL

The DataSnap server methods are using JSON as data stream via REST protocol.  For example, a simple EchoString server method defined as:

type
  {$MethodInfo On}
  TMyServerMethod = class(TPersistent)
  public
    function EchoString(Value: string): string;
  end;
  {$MethodInfo Off}

implementation

function TMyServerMethod.EchoString(Value: string): string;
begin
  Result := Value;
end;

To access this method compiled in ISAPI DLL via URL, the URL is something like

http://localhost/datasnap/MyISAPI.DLL/datasnap/rest/TMyServerMethod/EchoString/Hello

and the response text will be:

{"result":["Hello"]}

Likewise, a CGI URL is

http://localhost/datasnap/MyCGI.exe/datasnap/rest/TMyServerMethod/EchoString/Hello


Reference:

  1. DataSnap 2010 HTTP support with an ISAPI dll; Author: Tierney, Jim