Showing posts with label Apple. Show all posts

Monday, April 16, 2012

FireMonkey Development Setup for iOS: Delphi XE2 Update 4

Introduction

This topic shows how to setup FireMonkey Development environment for iOS – Apple’s mobile device platform for iPhone, iPAD or iPod touch.

To continue installation, Xcode 4.2 should be ready in Mac OS X machine.

Install FireMonkey – iOS SDK

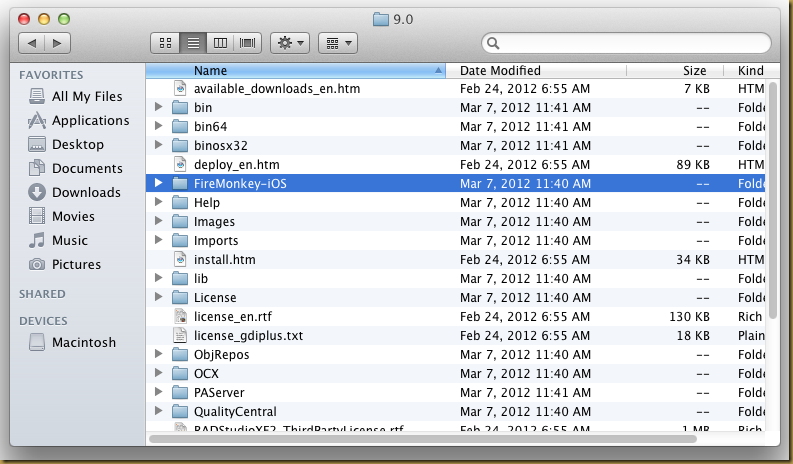
The FireMonkey iOS SDK is available in Delphi XE2 folder FireMonkey-iOS.  The following folder is a shared folder from VMware machine: %ProgramFiles(x86)\Embarcadero\RAD Studio\9.0:

Screen Shot 2012-04-14 at 9.59.25 AM

Locate FireMonkey-iOS.dmg disk image in the folder:

Screen Shot 2012-04-14 at 9.59.38 AM

Open or mount the disk image:

Screen Shot 2012-04-14 at 9.59.49 AM

Install both packages in the following sequence:

  1. fpc-2.6.0.intel-macosx.pkg
  2. FireMonkey-iOS-XE2.pkg

A new folder: Embarcadero should be created in Developer folder:

Screen Shot 2012-04-14 at 10.12.39 AM

The FireMonkey iOS SDK is ready for Xcode to compile FireMonkey iOS project now.

Reference

  1. FireMonkey Development Setup for iOS. URL: http://docwiki.embarcadero.com/RADStudio/en/FireMonkey_Development_Setup_for_iOS

Install Xcode 4.2.1 on Mac OS X

Xcode install assistant

To install Xcode on Mac OS X, download a Xcode package from Apple developer site.

Screen Shot 2012-04-14 at 9.36.26 AM

Open the package InstallXCodeLion.pkg and follow the instruction to start the installation:

Screen Shot 2012-04-14 at 9.37.01 AM

Unmount Xcode installer package

The Xcode install assistant is an installer that copy Xcode installer files into hard drive and prepare an environment for Xcode installer.  The Xcode hasn’t install yet.  Continue the steps to perform actual Xcode install.

The mounted Xcode package installer is not necessary anymore.  You may eject the mounted package:

Screen Shot 2012-04-14 at 9.43.06 AM

Install Xcode

To continue Xcode installation, locate Install Xcode icon in Applications folder:

Screen Shot 2012-04-14 at 9.45.27 AM

Follow the instructions to finish the installation:

Screen Shot 2012-04-14 at 9.45.39 AM

After finish installation, the Xcode application will appear on the Dock area:

Screen Shot 2012-04-14 at 9.57.48 AM

A new folder Developer should appear in your hard disk:

Screen Shot 2012-04-14 at 10.12.11 AM

The Xcode is now finish install, you may now start using Xcode to develop application in Apple platform:

Screen Shot 2012-04-16 at 2.00.26 PM

Mac OS X on VMware: Update 10.7.1–10.7.3

Introduction

Install update via Mac OS X Software Update function may take some time to download the update package especially when the file size is over Gigabytes.  It is a good practice to download update package and perform offline update in later stage.  If anything happen during the update process, you may redo the update again if you have snapshot your Mac OS X machine instance.

Some update involve some tricky steps to make sure the Mac OS X continue function on VMware machine.

Mac OS X Update: 10.7.1

Download Mac OS X 10.7.1 update from apple web site.  Perform the update as usual:

Screen Shot 2012-04-16 at 1.33.18 PM

Mac OS X Update: 10.7.2

Mac OS X update 10.7.2 requires extra steps to works on VMware machine.  Follow the steps to perform update:

  1. Download Mac OX X 10.7.2 update from apple web site.
  2. Start Terminal application in Mac OS X
  3. Run a command to backup folder AppleLSIFusionMPT.kext:
    # cp -r /System/Library/Extensions/AppleLSIFusionMPT.kext .
  4. Apply Mac OS X Update 10.7.2
  5. When update is done, the update installer offer to reboot machine.  Don’t reboot first but execute the following two command to restore folder AppleLSIFusionMPT.kext:
    # sudo rm -rf /System/Library/Extensions/AppleLSIFusionMPT.kext
    
    # sudo cp -r AppleLSIFusionMPT.kext /System/Library/Extensions
  6. Reboot machine and enjoy the Mac OS X 10.7.2 update.

Screen Shot 2012-04-16 at 1.46.36 PM

Mac OS X Update: 10.7.3

Mac OS X update 10.7.3 share same update steps as 10.7.2.  However, the update from 10.7 to 10.7.3 must perform in the following sequence one at a time:

  1. 10.7.1
  2. 10.7.2
  3. 10.7.3

You can’t apply 10.7.3 on 10.7 directly.  Follow the steps to perform 10.7.3 update from 10.7.2:

  1. Download Mac OX X 10.7.3 update from apple web site.
  2. Start Terminal application in Mac OS X
  3. Run a command to backup folder AppleLSIFusionMPT.kext:
    # cp -r /System/Library/Extensions/AppleLSIFusionMPT.kext .
  4. Apply Mac OS X Update 10.7.3
  5. When update is done, the update installer offer to reboot machine. Don’t reboot first but execute the following two command to restore folder AppleLSIFusionMPT.kext:
    # sudo rm -rf /System/Library/Extensions/AppleLSIFusionMPT.kext
    
    # sudo cp -r AppleLSIFusionMPT.kext /System/Library/Extensions
  6. Reboot machine and enjoy the Mac OS X 10.7.3 update.

Screen Shot 2012-04-16 at 1.53.47 PM

Reference

  1. How To Install Fully Functional Mac OS X Lion Virtual Machine inside Windows 7 [UPDATE: 10.7.3]. URL:http://www.windows7hacker.com/index.php/2011/09/how-to-install-fully-functional-mac-os-x-lion-virtual-machine-inside-windows-7/

Running Mac OS X on VMware Workstation in Windows Platform

Introduction

This simple guide is for those who want to try out Apple’s Macintosh OS X on VMware Workstation in Windows platform.  The basic requirements are:
  1. A PC running Windows x86 or x64
  2. VMware Workstation 8
  3. Download the following files:
    1. Mac OS X Lion VMware Files.exe (Size: 2.42MB)
    2. Mac OS X Lion Retail Bootable .vmdk (For VMware) (A bit torrent of size 4.12GB)

Patch VMware Workstation 8 with VMware Workstation 8.0 Darwin Unlocker Windows

Before running Mac OS X on VMware workstation, a patch should apply to some binary files of VMware workstation.
For illustration purpose, the following example will attempt to patch VMware Workstation 8 binary files:
  1. First, extract the download file Mac OS X Lion VMware files.exe.using any file archive utility like 7-Zip or double click the .exe to extract the files.
  2. Open command prompt (cmd) in Administrator Account.
  3. Navigate to extracted folder “VMware Workstation Unlocker - Windows" and run install.cmd:
M:\>cd "VMware Workstation Unlocker - Windows"

M:\VMware Workstation Unlocker - Windows>install.cmd
VMware Unlocker 1.0.0
=====================
(c) Dave Parsons 2011
Stopping VMware services...
The VMware Workstation Server service is stopping.
The VMware Workstation Server service was stopped successfully.


The VMware Authorization Service service was stopped successfully.

Creating backup folders.
...
Starting VMware services...
The VMware Authorization Service service is starting.
The VMware Authorization Service service was started successfully.

The VMware Workstation Server service is starting.
The VMware Workstation Server service was started successfully.

M:\VMware Workstation Unlocker - Windows>
The VMware workstation 8 is now patched.  You may continue the next step to configure and run Mac OS X Lion on VMware workstation 8.

Install Mac OS X Lion on VMware Workstation

Prepare a Mac OS X machine

Extract pre-configure Mac OS X Lion VMware workstation files from Mac OS X Lion VMware Files.exe in a new folder:
1
Start the virtual machine Mac OS X Lion.vmx.  A dialog prompt for the virtual machine instance state: 
2
Press “I copied it” button to state the virtual machine is a cloned instance.

Prepare Mac OS X Installation

The machine setting may change to suit the environment.  e.g.: Memory size.
Next, add Mac OS X Lion Installer disk (Mac OS X Lion Installer.vmdk) by creating a new VMware hard disk.
2

Start Mac OS X Machine

Power on the virtual machine.  A Mac OS X installation screen should appear as follow:
5

Prepare a disk for Mac OS X installation

Next, start Disk Utility to prepare a disk for Mac OS X installation:
4
Create a new Mac OS X partition  by using the Erase option.  A label for the new disk may specify in the option:
6
Confirm the Erase operation:
7

Start Mac OS X Installation

Follow the screen instruction to continue Mac OS X installation:

9

Confirm the installation on the new disk created:

10

The installation may take a while to finish:
11

Finish Mac OS X Installation

Finally, the Mac OS X installed and the first screen appear as follow:

12

Install VMware tools

VMware tools provide few GUI enhancement experience for Mac OS X guest.  Download VMware tools ISO for OS X here.  Follow the following steps to install VMware tools in OS X:
  1. Extract a ISO file (darwin.iso) from the zip archive file
  2. Mount the ISO file to Mac OS X Guest operating system

    2
  3. Start Mac OS X guest system.
  4. Open Finder from OS X desktop and select CD/DVD ROM device.

    1
  5. Double click Install VMware Tools icon to start VMware tools installation
  6. Follow the screen instruction to complete installation.

Reference

  1. How To Install Fully Functional Mac OS X Lion Virtual Machine inside Windows 7 [UPDATE: 10.7.3]. URL: http://www.windows7hacker.com/index.php/2011/09/how-to-install-fully-functional-mac-os-x-lion-virtual-machine-inside-windows-7/