Sunday, June 21, 2009

Unattended Windows XP installation

Unattended Windows XP installation will speed up the installation process without answering dialogs prompted by Windows XP installation service.  It save times waiting for the dialog prompt.  After the installation finish, you have a ready Windows XP instance.  You may walk away when installing.  All dialog prompts’ answer are provided by a unattended answer file.

The answer file in .ini text file.  However, there is a tool to help you generate the answer file:

  1. Extract setupmgr.exe from Windows XP installation CD in folder \support\tools\deploy.cab
  2. Run setupmgr.exe and follow the screen instruction to generate the answer file.

Once the answer file is generated, you may install Windows XP via command line installation:

d:\> i386\winnt32.exe /syspart:c: /makelocalsource /unattend:answer.txt

Saturday, June 20, 2009

Recover damage Windows Vista or Windows 7 installation

In most case, normal Windows users seldom face unbootable windows installation as most user usually install windows in a single partition utilize all available hard drive spaces.

For user who play with multi boot loader like GRUB or partition the hard drive into few and install more than one Windows in each partition, they may face the problem if mistake make during installation or configuration.

Some common errors are:

  1. When booting a windows instance, system prompt:

    BOOTMGR is missing
    Press Ctrl+Alt+Del to restart
  2. When booting a windows instance, system prompt:

    File: \Boot\BCD
    Status: 0xc0000034
    Info: The Windows Boot Configuration Data file is missing required information

  3. When booting a windows, the window start-up screen shown but never complete the booting

The cause of the problems might be:

  1. File BOOTMGR does not exist in root drive (e.g: C:\)
  2. \Boot\BCD is corrupted or missing due to improper configuration during multi boot setup.
  3. MBR has corrupted or invalid.

The most common solution is using Windows Recovery Environment to solve the problem.

Solution 1: Using Windows Recovery Environment with Windows DVD

  1. Put the Windows installation disc in the disc drive, and then start the computer.
  2. Press a key when you are prompted: “Press any key to boot from CD or DVD…”.  Windows installation service will start booting
  3. Select a language, a time, a currency, and a keyboard or another input method, and then click Next.
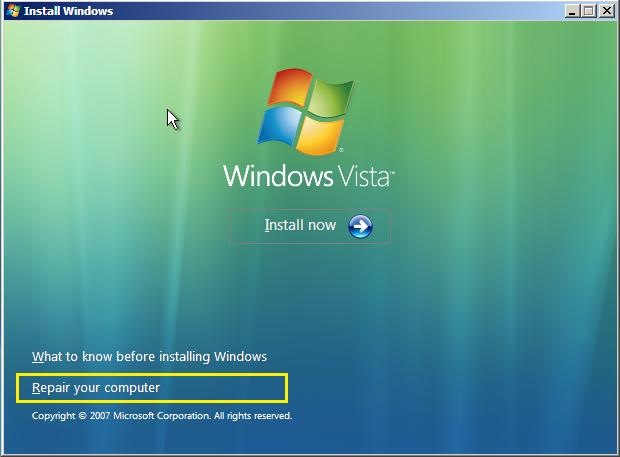
  4. Click Repair your computer.

    t1
  5. Click the operating system that you want to repair, and then click Next.
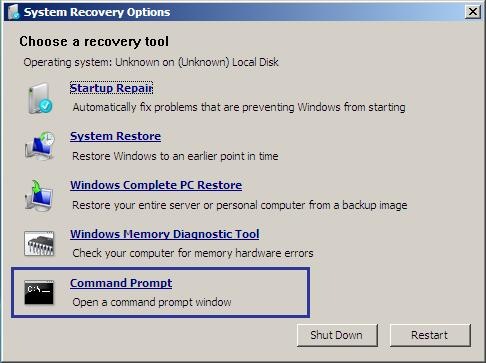
  6. In the System Recovery Options dialog box, click Command Prompt

    t2 
  7. In command prompt, type:

    X:\Sources> bootrec /fixmbr
    X:\Sources> bootrec /fixboot
    X:\Sources> bootrec /rebuildbcd

  8. Remove the Windows Installation disc and Restart the computer.
  9. Cross your finger and hope your Windows instance is back to normal.

Solution 2: Using Windows Recovery Environment in PXE environment

  1. Boot your computer into PXE service
  2. use “NET USE” to mount correct version of Windows installation share same as your damage Windows instance:

    e.g: net use k: \\server\windows.vista.share\
  3. Prepare to re-start your computer as Windows installation service
    1. copy k:\bootmgr c:\
    2. xcopy /s /e k:\boot c:\
    3. mkdir c:\sources
    4. copy k:\sources\boot.wim c:\sources
    5. k:\boot\bootsect.exe /nt60 c:
  4. Restart your computer
  5. Refer to step 3 of Solution 1 to continue the Windows Recovery Environment.
  6. If you able to recover the windows instance, you may do the following clean up task:
    1. Delete sources folder
    2. Start CMD in administrator mode and type

      attrib +s +h +r c:\bootmgr
      attrib +s +h –a c:\boot

Reference:

  1. Microsoft knowledgebase: Error message when you start Windows Vista: "The Windows Boot Configuration Data file is missing required information"; URL: http://support.microsoft.com/kb/927391
  2. How to Install Windows 7 or Windows Vista on Physical Machine Without DVD Media; URL: http://keznews.com/5185_How_to_Install_Windows_7_or_Windows_Vista_on_Physical_Machine_Without_DVD_Media

Friday, June 12, 2009

Synergy: Control machines with one set Keyboard and Mouse

Note: Please refer to Input Director for better solution.

If you have more than one machine (PC or notebook) on your desktop, you may use new set of keyboard and mouse for each machine on your desktop.  The Synergy application is here to help you reduce the devices on your desk by using just one set of keyboard and mouse to control all machines.  Synergy works on Windows XP, Windows Vista, Windows 7 or even Linux and Mac.

Example

This example show how to install and configure Synergy for 3 machines name as:

  1. Streamyx (OS: Windows XP)
  2. Optimus (OS: Windows Vista)
  3. Windows7 (OS: Windows 7)

Each machine attached with a LCD monitor individually.  The sequence of machines from Left to Right on desk are Streamyx, Optimus and Windows7.
First, install synergy on these 3 machines.  My keyboard and mouse attached to machine Optimus.  Thus, Optimus will be server.

Server Configuration: Optimus

Start synergy and click "Share this computer's keyboard and mouse (server)".
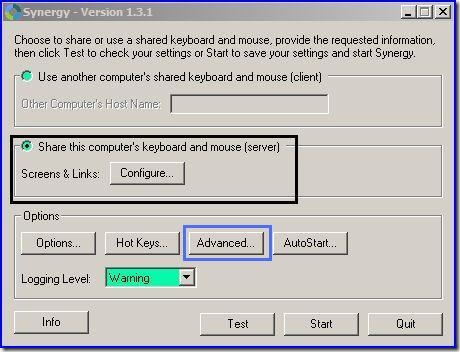
1

Click “Advance” button to set server’s parameters:
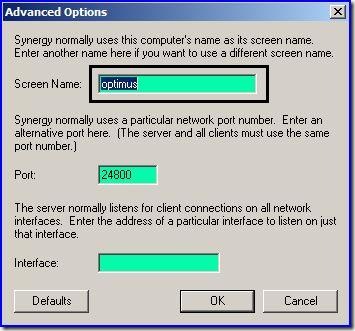
3

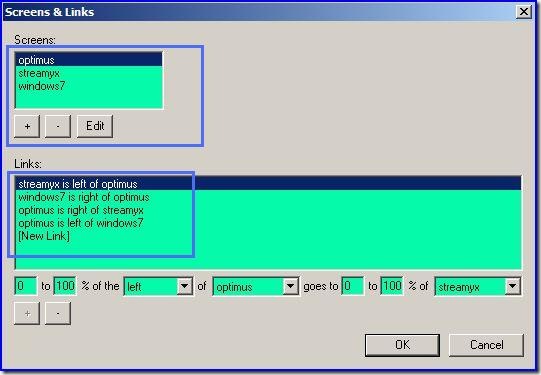
Press “Configure” button to configure:

  1. Add three machines’ screen name to “Screens” list box.
  2. A link is a pair of distinct adjacent screen.  Each adjacent pair must configure as 2 links.  For example, “Streamyx is left of Optimus” and “Optimus is right of Streamyx”
2

Click “Test” or “Start” button start synergy service.

Client Configuration: Streamyx and Windows7

Synergy configuration on client machines are simple:

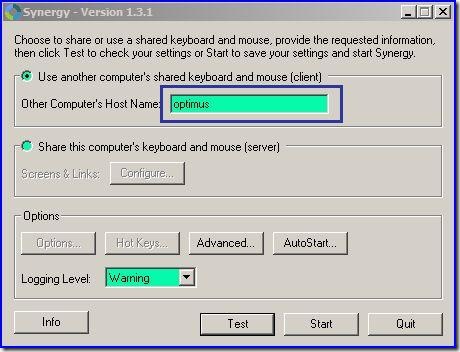
  1. Click “Use another computer’s shared keyboard and mouse (client)”
  2. Enter the server host name (optimus)
  3. Click “Test” or “Start” button to establish connection
4

You may now enjoy using one set of mouse and keyboard to control three machines.

References:

  1. http://synergy2.sourceforge.net/

Friday, June 05, 2009

Firebird: Deal with Unavailable Database

“unavailble database” error prompt connecting to Firebird service is annoying and difficult to trace.  Sometime it work and sometime it doesn’t.  We don’t know when it work and when it doesn’t work.

“unavailable database” happen in TCP/IP connection

Use TCP/IP connection string to connect to a Firebird database is easy to trace.  The connection string looks like

  • 192.168.5.1:/data/db/test.fdb
  • localhost:/data/db/test.fdb

Please note that localhost is not using local protocol connection but it is a TCP/IP connection using loopback address.

If you encounter “unavailable database” error for TCP/IP connection, please make sure:

  1. You network connection on both end are working and the TCP/IP configuration is correct.  Try to run “PING” to the Firebird server will confirm the connection is working.
  2. Make sure Firebird Service is running
  3. Make sure Firewall doesn’t block Firebird listening port.  Default port number is 3050
  4. Make sure the connection string point to valid Firebird database file

Once you got above verified, the “unavailable database” error prompt should gone.

“unavailable database” happen in Local Protocol

The data transmission throughput for local protocol is few times better than TCP/IP connection.  However, it is easy to encounter “unavailable database” error while using Local Protocol when Firebird is running as service.  The connection string is simple:

  • c:\db\test1.fdb
  • c:\db\test2.fdb

The connection string is the database file path itself without any prefix.

Using Local Protocol with Firebird 1.5

  Run as Application Run as Service
Windows XP Yes Yes. Only work for first logon user
Windows Vista Yes No

Using Local Protocol with Firebird 2.X

  Run as Application Run as Service
Windows XP Yes Yes.  Work for any number of logon users
Windows Vista Yes No

The above tables explains why local protocol sometime work and sometime doesn’t work.